My Highly Optimized Course Creation Workflow
This is not a post about using AI to automatically create courses. Instead, I'll show you how I use AI & automation software to make the creation processes less stressful and faster, while delivering a superior output to students.
Creating high-quality video content can be a grueling task. However, with the right tools and workflow, this process can become significantly more manageable.
Here's how I streamlined my content creation process for my new course, Ghost 5 Mastery.
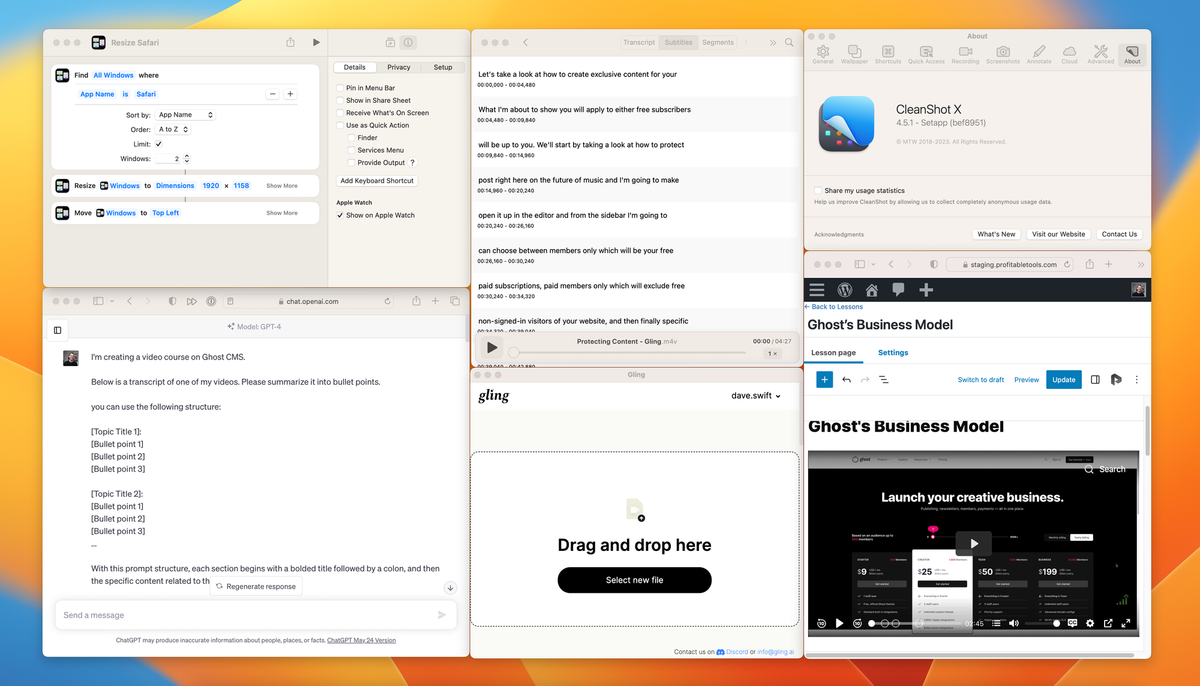
1. Browser Window Sizing
First, I make sure my browser window is sized appropriately. I use an Apple Shortcut to resize my window. This shortcut resizes to a size slightly larger than 1080p, enabling me to crop out the URL bar while maintaining a 16:9 aspect ratio.
Download my exact shortcut:
2. Screen Recording
Next, I record my screen using CleanShot X, setting it to record at 1920 x 1080. You can access CleanShot X through Setapp or purchase it directly.
3. Video Editing
I use an AI-powered app called Gling for rough video editing. Gling transcribes the video and attempts to detect and remove bad takes. While it's not 100% perfect, you can manually adjust it to get very close.

Alternatively, consider Recut, which doesn't use AI but can detect silence and create edits for you. Unlike Gling, which is subscription-based and processes in the cloud, Recut is a lifetime deal & a local application that can export XML to Final Cut and all other major editors with great accuracy.

4. Final Edits
After a rough edit in Gling, I export the video to Final Cut for final edits. There is a reason that Final Cut Pro is used by creators everywhere. It's simple and fast. I paid for it 10 years ago and have never paid for an update!
Beware, Gling's XML exports to FCP can be wonky. You might need to manually adjust the start and endings of each edit, but it's much faster than editing everything manually.
One way to improve the accuracy of Gling is to adjust the padding setting, I find that .2 (end only) gets me a lot closer to "automated" editing.

5. Video Transcription
From Final Cut, I send my video to MacWhisper, a local instance of OpenAI's WhisperAI, for transcription. The accuracy of this AI is impressive. I use the large model, but the medium model also delivers great results.

6. Lesson Creation
While MacWhisper works its magic, I create a new lesson in LearnDash. I use Focus mode set to full width, ensuring that embedded videos play as large as possible without forcing you to go full screen.

For my WordPress site, I use GenerateBlocks, specifically the local patterns feature. I've created a pattern for my course summary, which drops in a PrestoPlayer block as well as a container for a lesson summary.


<!-- wp:presto-player/bunny {"preset":6} /-->

<!-- wp:generateblocks/container {"uniqueId":"9bf9dd2c","isDynamic":true,"blockVersion":3,"display":"flex","flexDirection":"column","alignItems":"flex-start","sizing":{"width":"100%","widthTablet":"100%"},"paddingTop":"48","paddingRight":"12","paddingLeft":"12"} -->
<!-- wp:generateblocks/container {"uniqueId":"9ef742cf","isDynamic":true,"blockVersion":3,"display":"flex","flexDirection":"column","sizing":{"width":"650px","widthTablet":"100%"}} -->
<!-- wp:generateblocks/headline {"uniqueId":"adff3524","element":"h3","blockVersion":2,"backgroundColor":"","textColor":"","linkColor":"","linkColorHover":"","borderColor":"","highlightTextColor":"","iconColor":""} -->
<h3 class="gb-headline gb-headline-adff3524 gb-headline-text">Lesson Summary</h3>
<!-- /wp:generateblocks/headline -->
<!-- /wp:generateblocks/container -->
<!-- /wp:generateblocks/container -->
Copy and paste this code into your own "Local Pattern" using GenerateBlocks Pro.
7. Video Upload
I use PrestoPlayer inside of WordPress, but Bunny Stream is set as my video host.
Bunny is the most affordable way to security host your videos and it's entirely supported by both Presto Player & LearnDash, as well as my favorite WordPress plug-in: WP Fusion.

8. Lesson Summary & Chapter Markers
Next, I go back to MacWhisper to export the transcription to VTT format. These transcriptions can be useful in unexpected ways, so I save them in a folder with my final videos.

Custom Instructions On ChatGPT Plus
I use ChatGPT's "Custom Instructions" feature (only available on the Plus plan) to be able to paste in my transcripts without the need for additional prompting.
I save each prompt and keep them in my history to make it easy to go back and generate the necessary content. I recommend fine-tuning my custom instructions below and saving them to a pinboard in Paste for easy recall.
Automating Bulleted Summaries
I then use ChatGPT combined with MacWhisper's transcript to generate perfectly formatted lesson summaries. These summaries can be copied and pasted into the lesson with minimal edits.
Bulleted Summaries Custom Instructions
I'm creating a video course on Ghost CMS.I will provide you transcripts of my videos. Please summarize them into bullet points.you can use the following structure:[Topic Title 1]:[Bullet point 1][Bullet point 2][Bullet point 3][Topic Title 2]:[Bullet point 1][Bullet point 2][Bullet point 3]...With this prompt structure, each section begins with a bolded title followed by a colon, and then the specific content related to that title is listed in bullets.Do not give the overall summary a title. Please don't put the section title in brackets. Make the section title bold.The summary will be posted below the video for students. Instead of referring to the presenter or instructor, say "We...".For example, "We begin by creating a new page".Do not say, "The instructor begins by creating a new page."Look out for things that I promise in the video such as links or code snippets and let me know separately, do not include that in the bulleted summary.
Automating Chapter Markers
With ChatGPT, I can also create accurate chapter markers. Here are the custom instructions I use to generate Chapter Markers.
Chapter Marker Maker GPT Custom Instructions
I'm producing a video course on Ghost CMS and need your assistance in generating chapter markers for significant sections. Here are the key guidelines:I'll provide you with course transcripts. Your job is to review these and identify the primary topics.Identify the timestamps that align with notable shifts in content, reflecting the main themes of the course.To accurately do this, a comprehensive review of the transcript may be necessary before deciding on suitable sections.Keep in mind not to overdo Chapter Markers. They should only mark major changes in topics, and these shifts should happen no more frequently than every thirty seconds.However, it's perfectly fine for one to two minutes or more to pass without a new chapter starting.The Chapter Markers you generate should include a Title and a timestamp. The timestamp should be in the 'mm:ss' format. The transcripts I'll provide will use the 'hh:mm:ss.sss' format, so you'll need to convert them accordingly.Here's an example of a high-quality Chapter marker and the format I want you to use:00:00 Intro00:31 Ghost Website WalkthroughThe primary purpose of these Chapter markers is to make the video content more navigable and digestible for viewers. Be sure not to create chapter markers too frequently, group similar items into one larger chapter.No new chapters in the last 20 seconds of the video.Output chapter markers to a code box.
Using Paste, my clipboard manager, I copy and paste the chapter start time and title one at a time, saving them to my stack. Then, I go back to PrestoPlayer to paste them in rapidly.

9. Subtitles Upload
Finally, I upload the subtitles to the video in PrestoPlayer. Make sure you enable the Closed Caption feature and turn on the search feature so people can search lessons for specific phrases.
And voilà! You now have a perfectly edited video, complete with accurate subtitles, chapter markers, and a lesson summary. Thanks to the efficiency of AI and the right tools, the process is significantly streamlined. I am indeed very grateful for our new robotic helpers.