
Screen Studio Review: Cinematic Screen Recordings on Mac
Screen Studio automatically transforms basic screen recordings into beautifully animated, cinematic videos with smooth mouse movements, auto-zoom, and motion blur — no video editing skills required.

Screen Studio
Screen Studio automatically turns Mac screen recordings into cinematic, professionally animated videos with smooth cursor movements, auto-zoom on clicks, and motion blur.
Developers, content creators, and anyone who needs polished screen recordings for social media, tutorials, or product demos without learning a full video editor.
CleanShot X, Loom, OBS Studio, ScreenFlow
Why Every Developer's Screen Recordings Suddenly Look Incredible
If you spend any time on developer Twitter or tech social media, you've probably noticed a dramatic shift in the quality of screen recordings over the past few months. What used to be plain screenshots and lines of text has turned into Hollywood-quality animated demos with perfectly smooth mouse movements, elegant zoom transitions, and beautiful click animations.
This kind of polish used to require a full video editing suite — we're talking After Effects-level work to get screen recordings looking this cinematic. But a tool called Screen Studio has changed that entirely, making it possible to produce these professional-looking recordings with almost zero effort. The software is in very active development, with its founder Adam regularly shipping new features (sometimes multiple times per week), so it keeps getting better.
Recording Options and Setup
Screen Studio's recording interface is clean and straightforward. You get three core capture modes: full display, window, and free-form area selection. The full display mode helpfully highlights which monitor will be recorded if you're running a multi-monitor setup, so there's no guessing.
Window recording is where things get particularly polished. When you select a specific application window, Screen Studio offers presets for common resolutions like 1920×1080, and even includes vertical 9:16 for YouTube Shorts and social media content. The free-form option lets you drag a custom area or type in exact pixel dimensions — small touches, but the kind of fit and finish you don't see in most screen recorders.
On the input side, Screen Studio supports multiple audio inputs and cameras simultaneously. It works seamlessly with Continuity Camera, meaning you can use your iPhone as a high-quality webcam without any additional configuration. Additional settings include an enhanced microphone audio toggle, customizable countdown timer before recording starts, and a global keyboard shortcut for start/stop control. There's even experimental support for iOS screen recording via a Lightning connection to your Mac.
Background, Screen, and Visual Customization
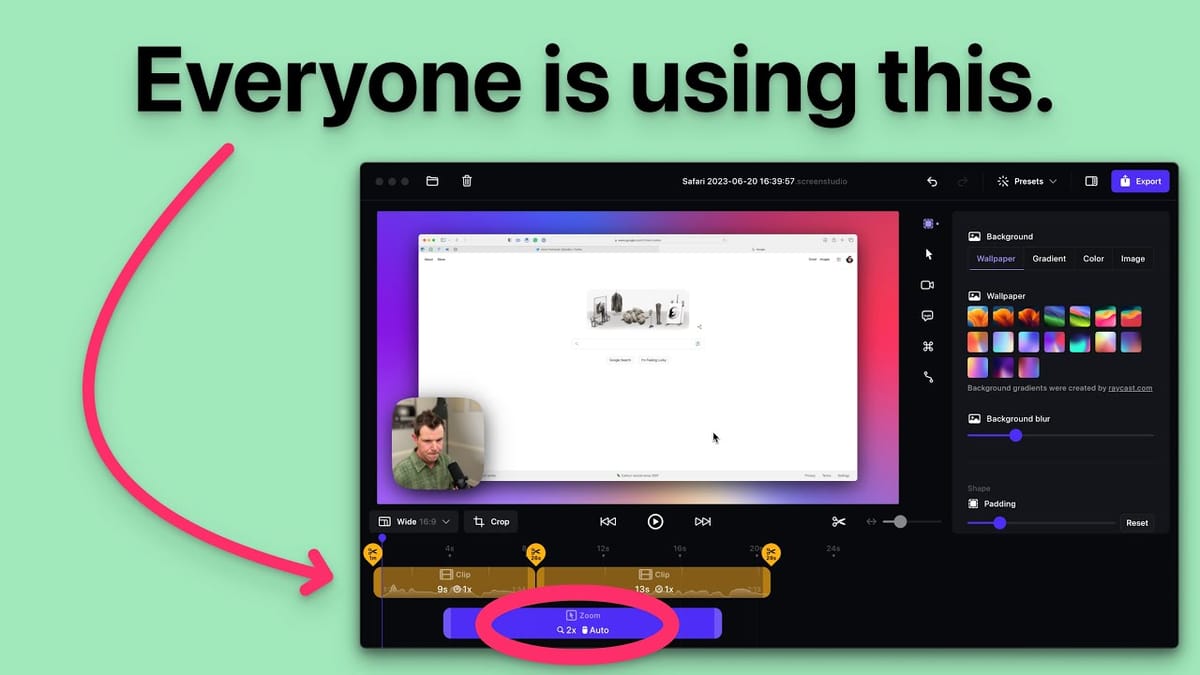
Once you've captured your footage, Screen Studio's sidebar editor is where the magic happens. The background and screen section alone has a surprising amount of depth. Your recording is placed on top of a wallpaper background, and you can swap between built-in wallpapers (including ones from the latest macOS betas), apply background blur for a softer look, or switch to custom gradients, flat colors, or your own uploaded images for fully on-brand presentations.
Padding controls let you adjust how much background is visible around your recording, while corner rounding lets you soften the edges of the captured window. There's also an inset option — think of it like CSS padding for your screen recording — that adds an extra layer of spacing with a customizable color. Shadow controls round out the section, with presets from flat to dramatic and advanced settings for dialing in exact shadow parameters. Every one of these settings combines to give your recording that polished, floating-window aesthetic that looks so striking on social media.
Cursor and Camera Controls
The cursor section gives you fine-grained control over how your mouse appears in the final video. You can hide it entirely if you want the focus purely on the product, resize it from real-size up to something much more visible for tutorials, or switch to the iPad-style touch interface cursor. Advanced options include disabling the text-field cursor (keeping a consistent pointer throughout), adding slight rotation during movement for a more natural feel, and freezing the cursor position at the end of the video so it doesn't awkwardly drift off screen when you reach for the stop button.
Camera controls are equally flexible. You can toggle your webcam overlay on or off after recording — great for those days when you just don't love how you look on camera. Position presets let you place the camera feed at different screen corners, though there's no option for pixel-perfect custom placement yet. You can mirror the camera, adjust corner roundness from squared-off to nearly circular, resize the overlay, and even configure how much the camera feed shrinks during zoom animations. By default, the webcam overlay scales down to 70% during zooms to keep focus on the screen content, but that's fully adjustable.
Auto-Zoom, Captions, and Animation Settings
The auto-zoom feature is arguably Screen Studio's killer feature. Every mouse click automatically triggers a smooth zoom animation toward the click location, and every zoom-out transition is equally cinematic. You can manually override any zoom — switching from auto to manual mode lets you pick the exact screen region to zoom into, adjust the zoom level, and control the "glide" (how much the virtual camera drifts while zoomed in). A recent update added the ability to bulk-remove all zooms at once, which is a huge time saver if you plan to export raw footage for editing in Final Cut Pro or another NLE.
Screen Studio also includes built-in caption generation powered by Whisper AI. Choose from base, small, or medium models, and the tool will transcribe your audio and burn word-by-word highlighted captions directly into the video — perfect for social media content where viewers often watch without sound. You can even provide a prompt with technical terms to improve transcription accuracy. Keyboard shortcut overlays are another nice touch for tutorial creators, displaying the keys you press right on screen.
The animation engine ties everything together. Motion blur is enabled by default and can be configured independently for cursor movement, screen zooms, and screen panning. Mouse smoothing cleans up jerky, real-world cursor movements into fluid, intentional-looking motion. Speed controls for both mouse and zoom animations range from slow to rapid, with advanced tension, friction, and mass parameters for anyone who wants to fine-tune the physics.
Editing and Export Options
The built-in editor is functional but intentionally minimal — don't expect a full non-linear editing suite like Final Cut. You can split clips at any point in the timeline (or press S for a quick split), then right-click to remove unwanted segments. It's a three-step process that works but isn't quite as fast as dedicated editors. The sidebar can be hidden when you need more timeline real estate, which is a welcome addition.
Export options are well thought out. Four quality presets cover most use cases: Studio (highest quality for importing into NLEs), Social Media (slightly compressed but upload-ready), Web, and Web Low Quality. All exports default to 60fps for the smoothest possible playback. You can also export as a GIF or even copy the video directly to your clipboard — a quirky but occasionally useful feature. One thing to keep in mind: export times run significantly longer than recording times. A two-minute recording might take six minutes to export, and hour-long tutorials can mean three-hour export waits. The export time stays consistent across compression levels and only decreases if you reduce the output resolution.
Pricing and Final Verdict
Screen Studio is priced at $89 for a single device license or $189 for up to three devices, with team pricing available on request. The license includes one year of updates, after which you can keep using the version you have but won't receive new features. It's not a true lifetime deal, but given the pace of development, that first year alone delivers substantial value.
What's genuinely impressive about Screen Studio is how quickly it's maturing. Several complaints from the initial review were resolved within weeks through updates, which speaks volumes about the product's trajectory. If you're a developer sharing work on social media, a creator making software tutorials, or anyone who needs screen recordings that look dramatically better than the standard fare, Screen Studio is well worth the investment. The combination of auto-zoom, motion blur, and mouse smoothing produces results that would otherwise require hours of manual video editing.
Watch the Full Video
Prefer watching to reading? Check out the full video on YouTube for a complete walkthrough with live demos and commentary.


