Flipsnack Tutorial: Turn a PDF Into a Flipbook You Can Track
Turn a PDF into an interactive Flipsnack flipbook with video, buttons and a contact form, then use trackable links to see who read which page.

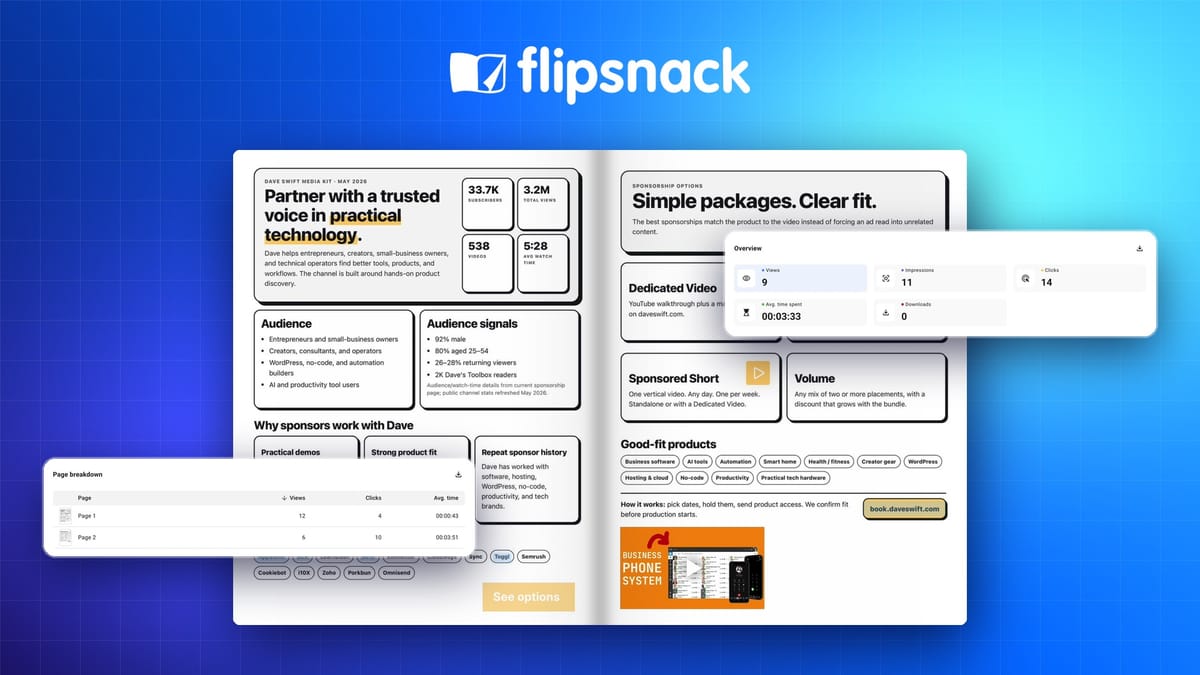
If you send PDF proposals, media kits or sales sheets and then sit around wondering whether anyone read them, I recommend trying Flipsnack. It turns that PDF into an interactive flipbook, and every person you send it to can get their own tracking link.
Flipsnack sponsored the video this guide is based on, and I built everything here on a test account they gave me. If you want to try it, you can start on the free plan, and my link gets you 20% off a paid plan: Try Flipsnack (code DAVESWIFT).
Why I wanted something better than a PDF
If you sell things B2B, you know the drill. You have to send out some type of proposal. In my case, it's a media kit.
When a company asks what it costs to sponsor one of my videos, I send them a two-page PDF. It covers my audience, the brands I've worked with, and the ways a brand can work with me.
Then I wait.
I don't know if they opened it. I don't know if they made it to page 2, where the actual sponsorship options are. And if anything changes in my business (I change my rates, or my subscriber count moves a lot), I have to send them a whole new file and hope they open that one.
My PDF also had a booking link on it that didn't work. I never figured out how to make it an actual link, then I got distracted and did something else. I suspect a lot of people have a PDF like that.
Flipsnack fixes the parts I can't do with a PDF. The document becomes a flipbook with real links, embedded video and a contact form. Each person gets their own link, so I can see whether they opened it, which pages they read, what they clicked, and whether they came back more than once.
Is a PDF enough? Sometimes it is. But I find a flipbook works best with people who aren't extremely technical. If you're not selling to an audience full of computer nerd developers, something that feels like a real book, with videos you can play right on the page, is exciting to them. And the marketer in me gets excited about the tracking.
What each Flipsnack plan includes
Some of what I built needs a paid plan, so here's how it lines up on Flipsnack's pricing page as of November 2026:
- Free: 5 flipbooks, up to 15 pages each, with Flipsnack branding on links and embeds. You can upload PDFs, create from scratch, add links and share by link, email or QR code.
- Pro: Video and other interactivity on the page, page statistics, trackable links, AI insights, Google Analytics and password-protected sharing.
- Business: Contact forms and quizzes, private sharing with specific people, expiring access, Zapier and your own domain.
- Enterprise: Click heat maps, the product catalog generator, HubSpot and Salesforce integrations, access codes, leak protection watermarks and restricting embeds to your own domain.
So you can try the PDF-to-flipbook part for free. The video embeds and tracking that make this worth doing start at Pro, and the contact form and expiring access I used need Business. I'll call out the plan as each feature comes up.
Step 1: Upload your PDF
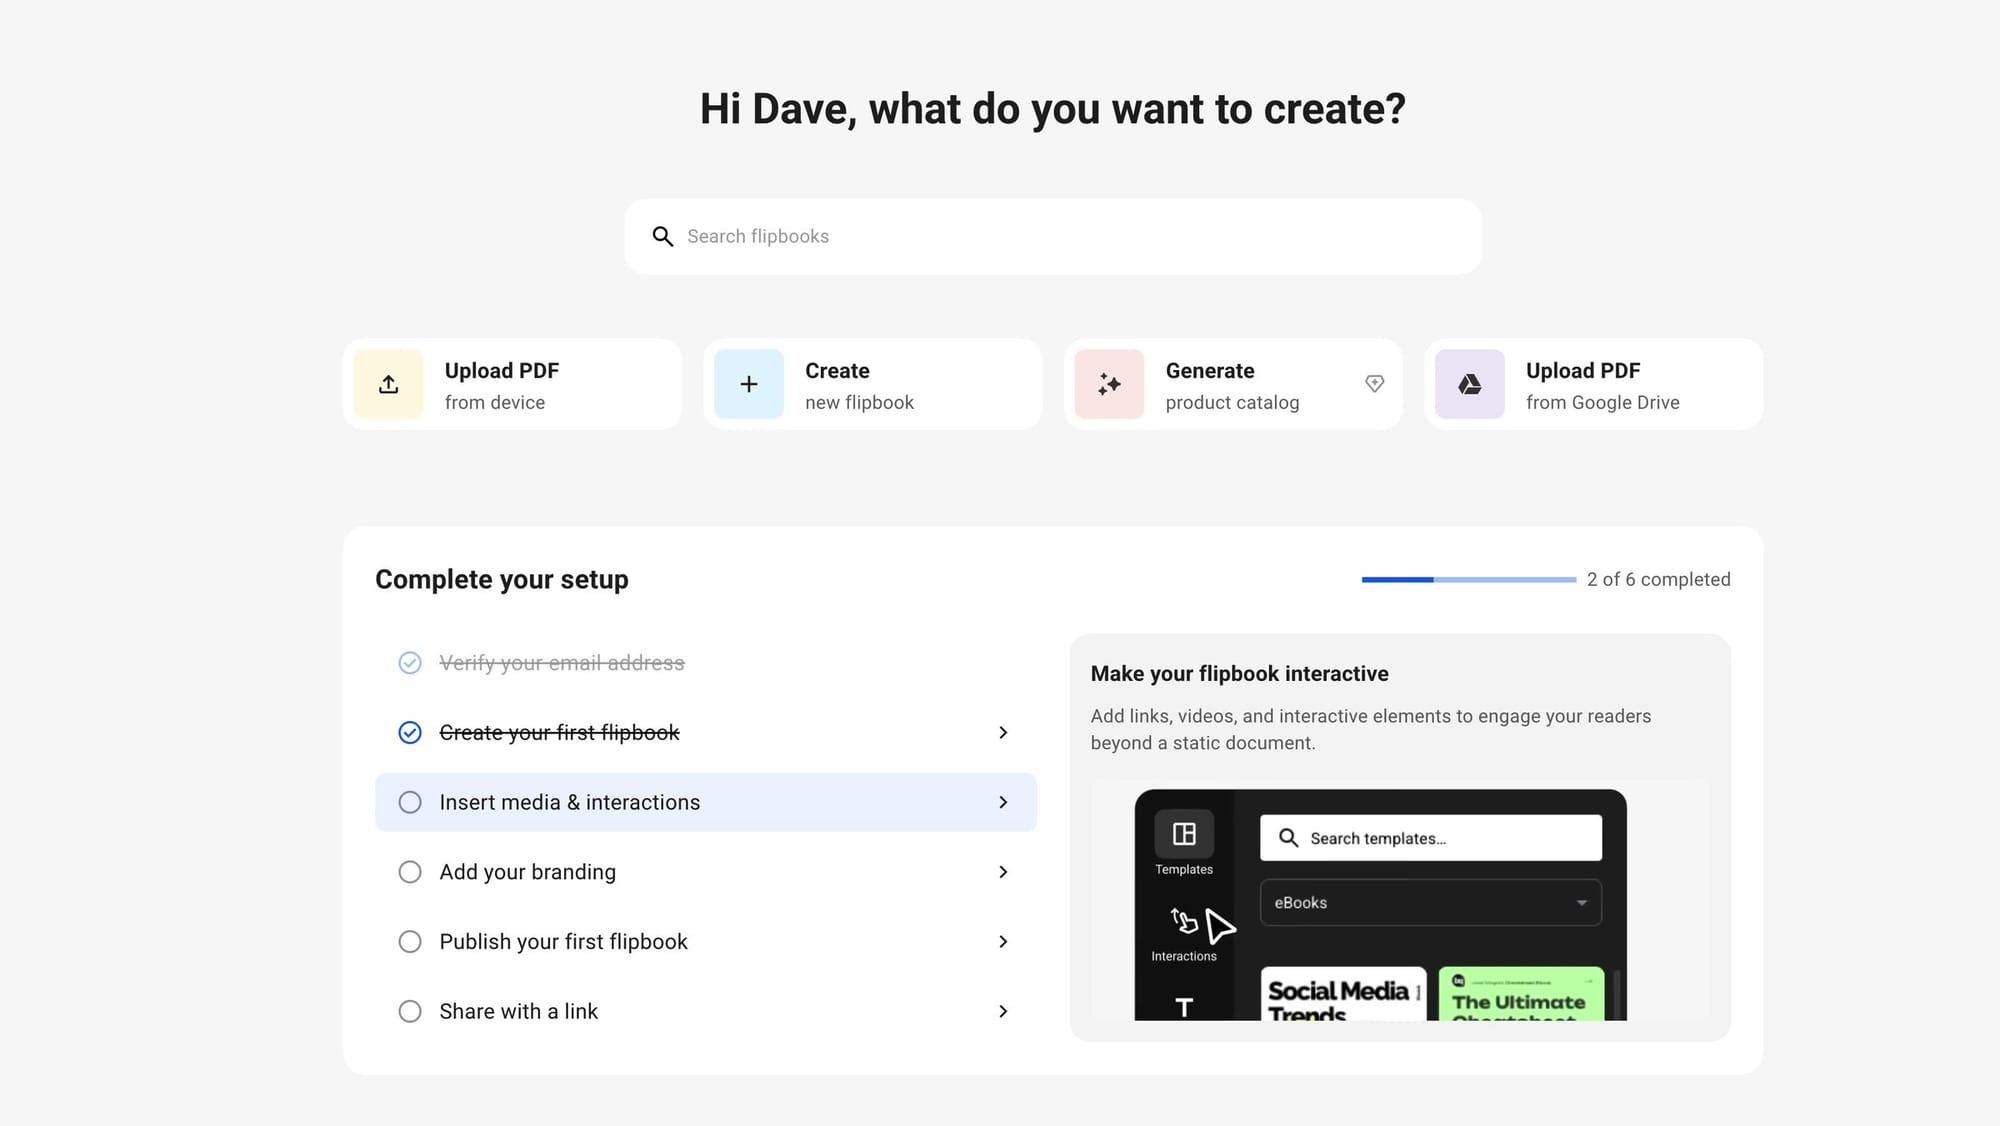
When you start a new flipbook, Flipsnack gives you four options:
- Upload a PDF from your computer. Use this if you already have an asset: a lead magnet, a media kit, whatever you send people now.
- Create from scratch. If you don't have anything yet, you can design it right inside Flipsnack.
- Generate a product catalog. This is for store owners who want an interactive catalog. It's an Enterprise feature, so I'd save it for established stores that are already doing good business.
- Upload from Google Drive. Same as the first option, just pulling the file from Drive.
I uploaded my existing media kit the old-fashioned way. Flipsnack converted it into a flipbook with a page-turn animation already built in. It's the same exact file, and it already looks kind of cool on its own.
Give each page a job
Before adding anything, I thought about what each page of my media kit is for.
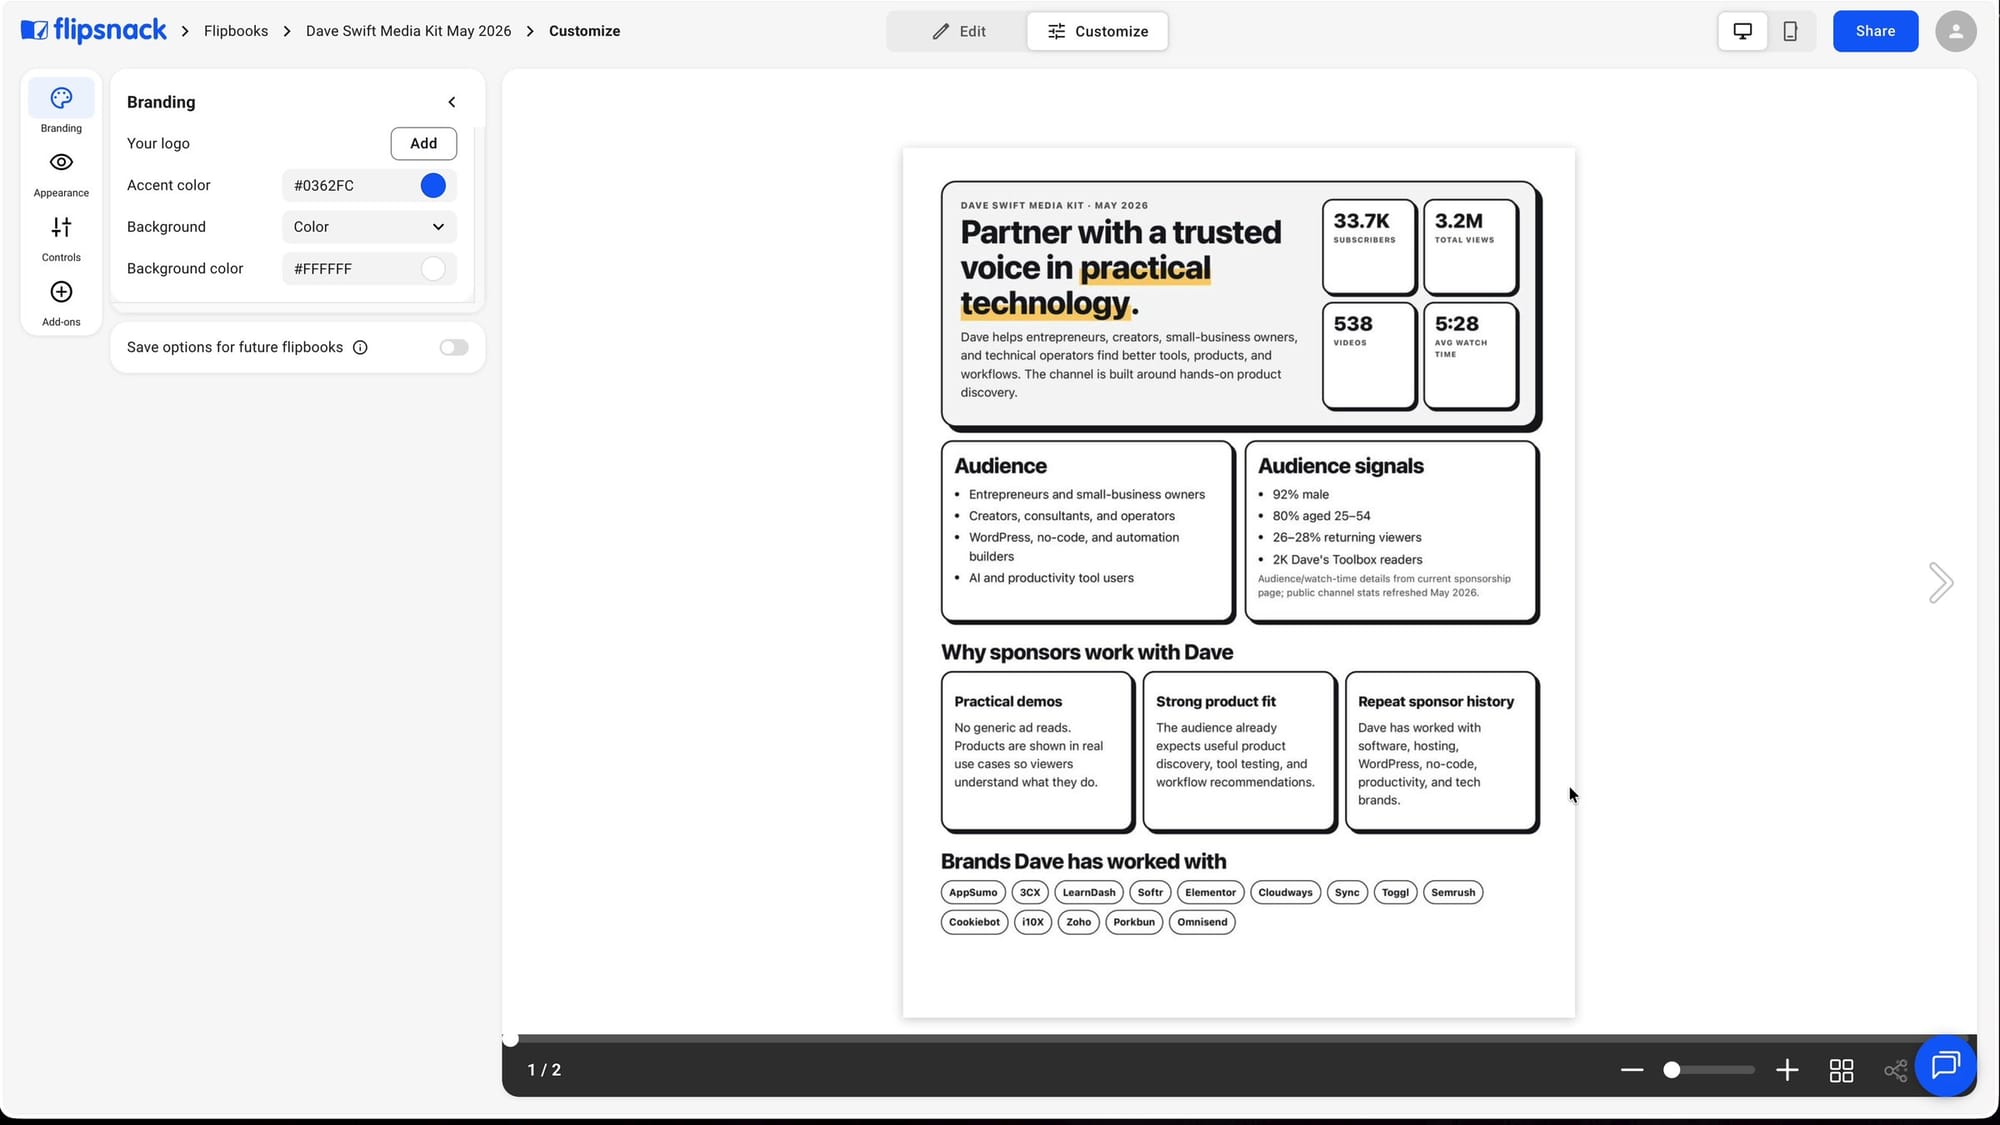
Page 1 answers: who is this, who are they reaching, and what will I get if I work with them?
Page 2 is for people who are already interested. It answers: how do I work with this person? What's on the menu? In my case that's a dedicated video, an integrated ad, a sponsored Short, or volume (a mix of all of those).
That breakdown decides what goes where. Proof belongs on page 1. Next steps, video examples and the booking button belong on page 2. And page 1 needs something that tells people page 2 exists.
Step 2: Embed a video on the page (Pro)
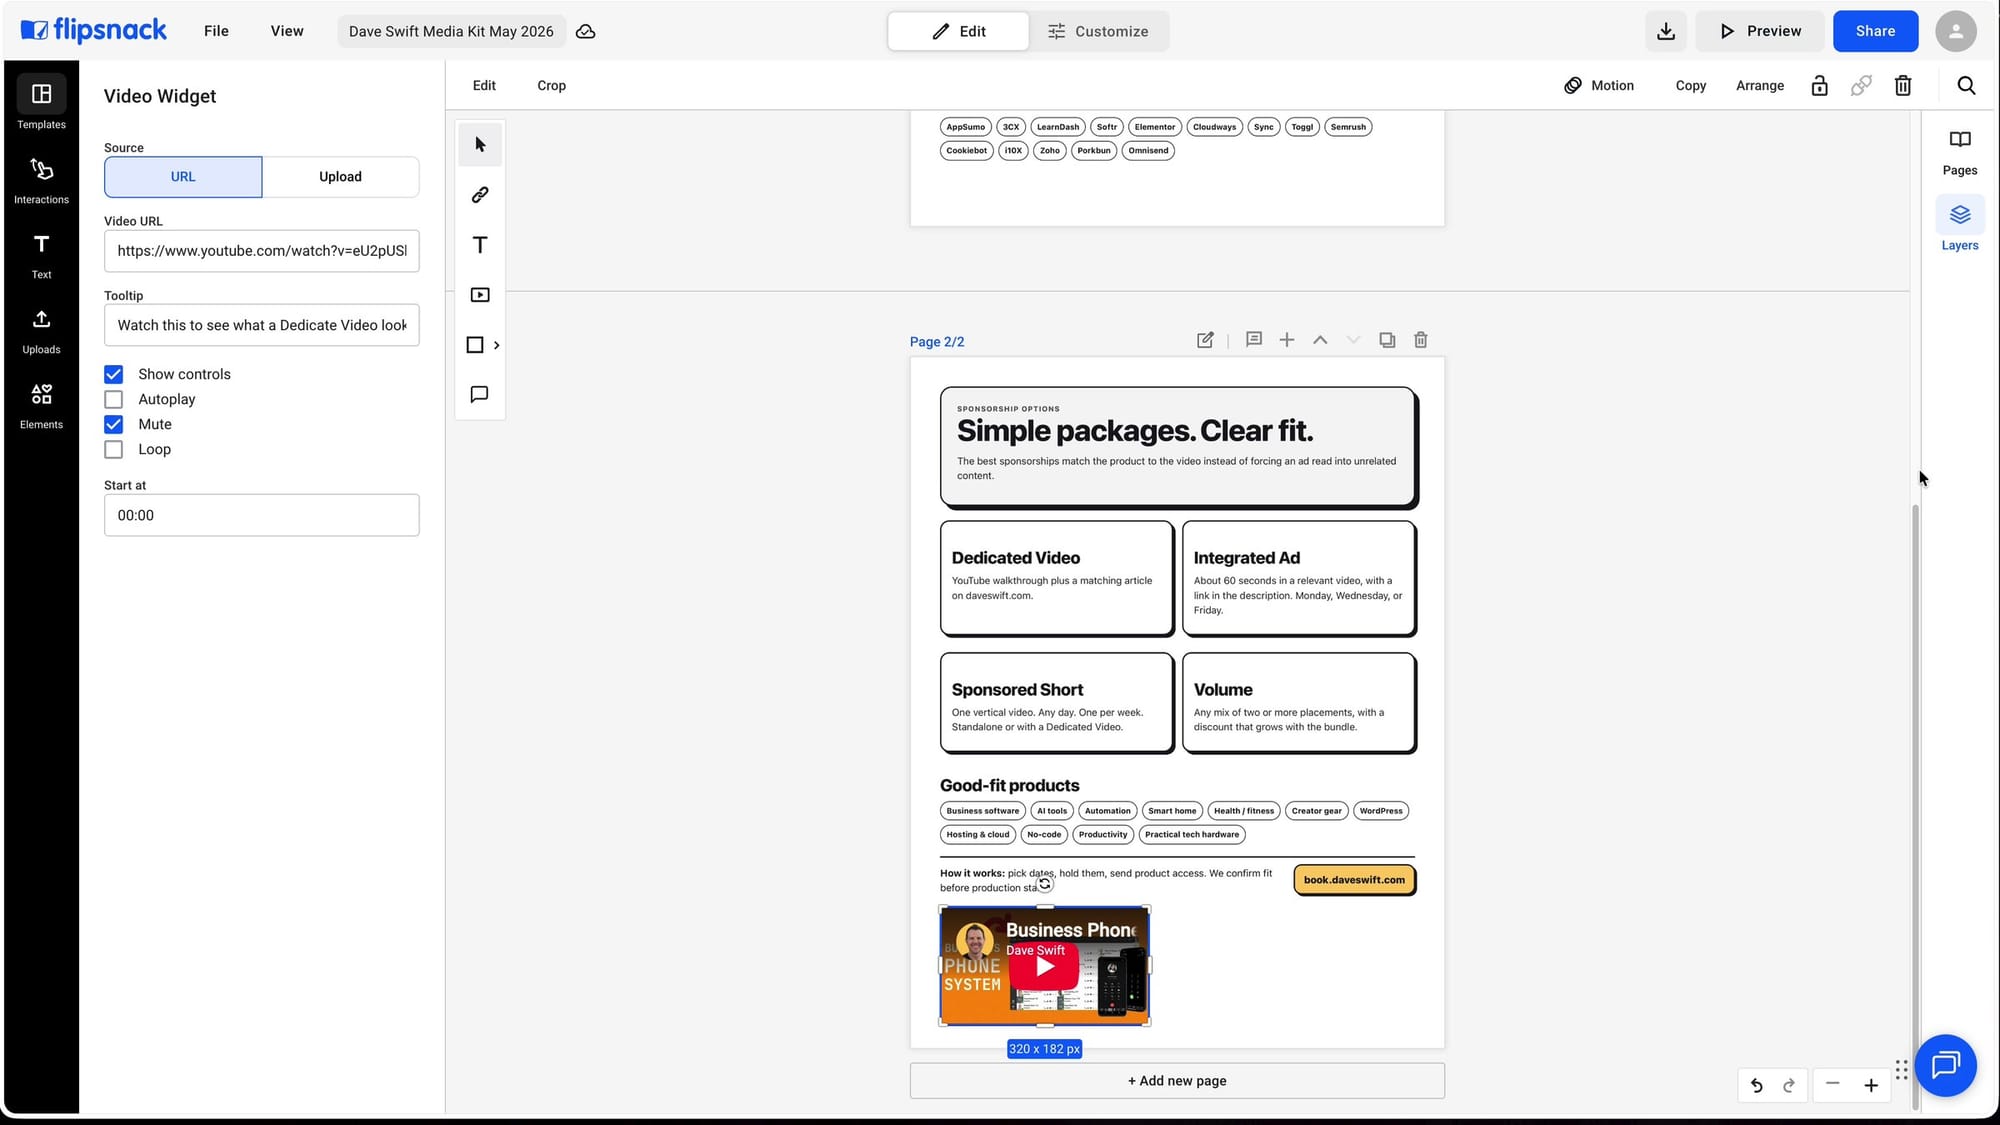
Here's what bugged me about my old PDF. I make video content, and I'm asking companies to buy video content by looking at a piece of paper. Even a virtual piece of paper. So I put a video right into the document.
- Click Edit to open the editor.
- Go to the page you want. I used the blank space at the bottom of page 2.
- Draw a video hotspot where you want the player. If you don't get it right the first time, you can move it.
- With the video widget selected (it's outlined in blue), paste your video URL. It accepts YouTube, Vimeo and most standard video sharing links. You can upload a video file, too, but I'd use YouTube for most people because viewers can watch it and share it with someone else.
- Add a tooltip. That's the text that appears when someone hovers over the video. Mine says, "Watch this to see what a dedicated video looks like."
You also get playback settings: show or hide the controls, play and pause buttons, autoplay when the page loads, muted and loop. I left the defaults.
The one I like most is the start time. If I want to show a sponsor what an integrated ad looks like, I can start the video exactly where the ad begins instead of making them hunt for it.
Step 3: Turn dead buttons into real links
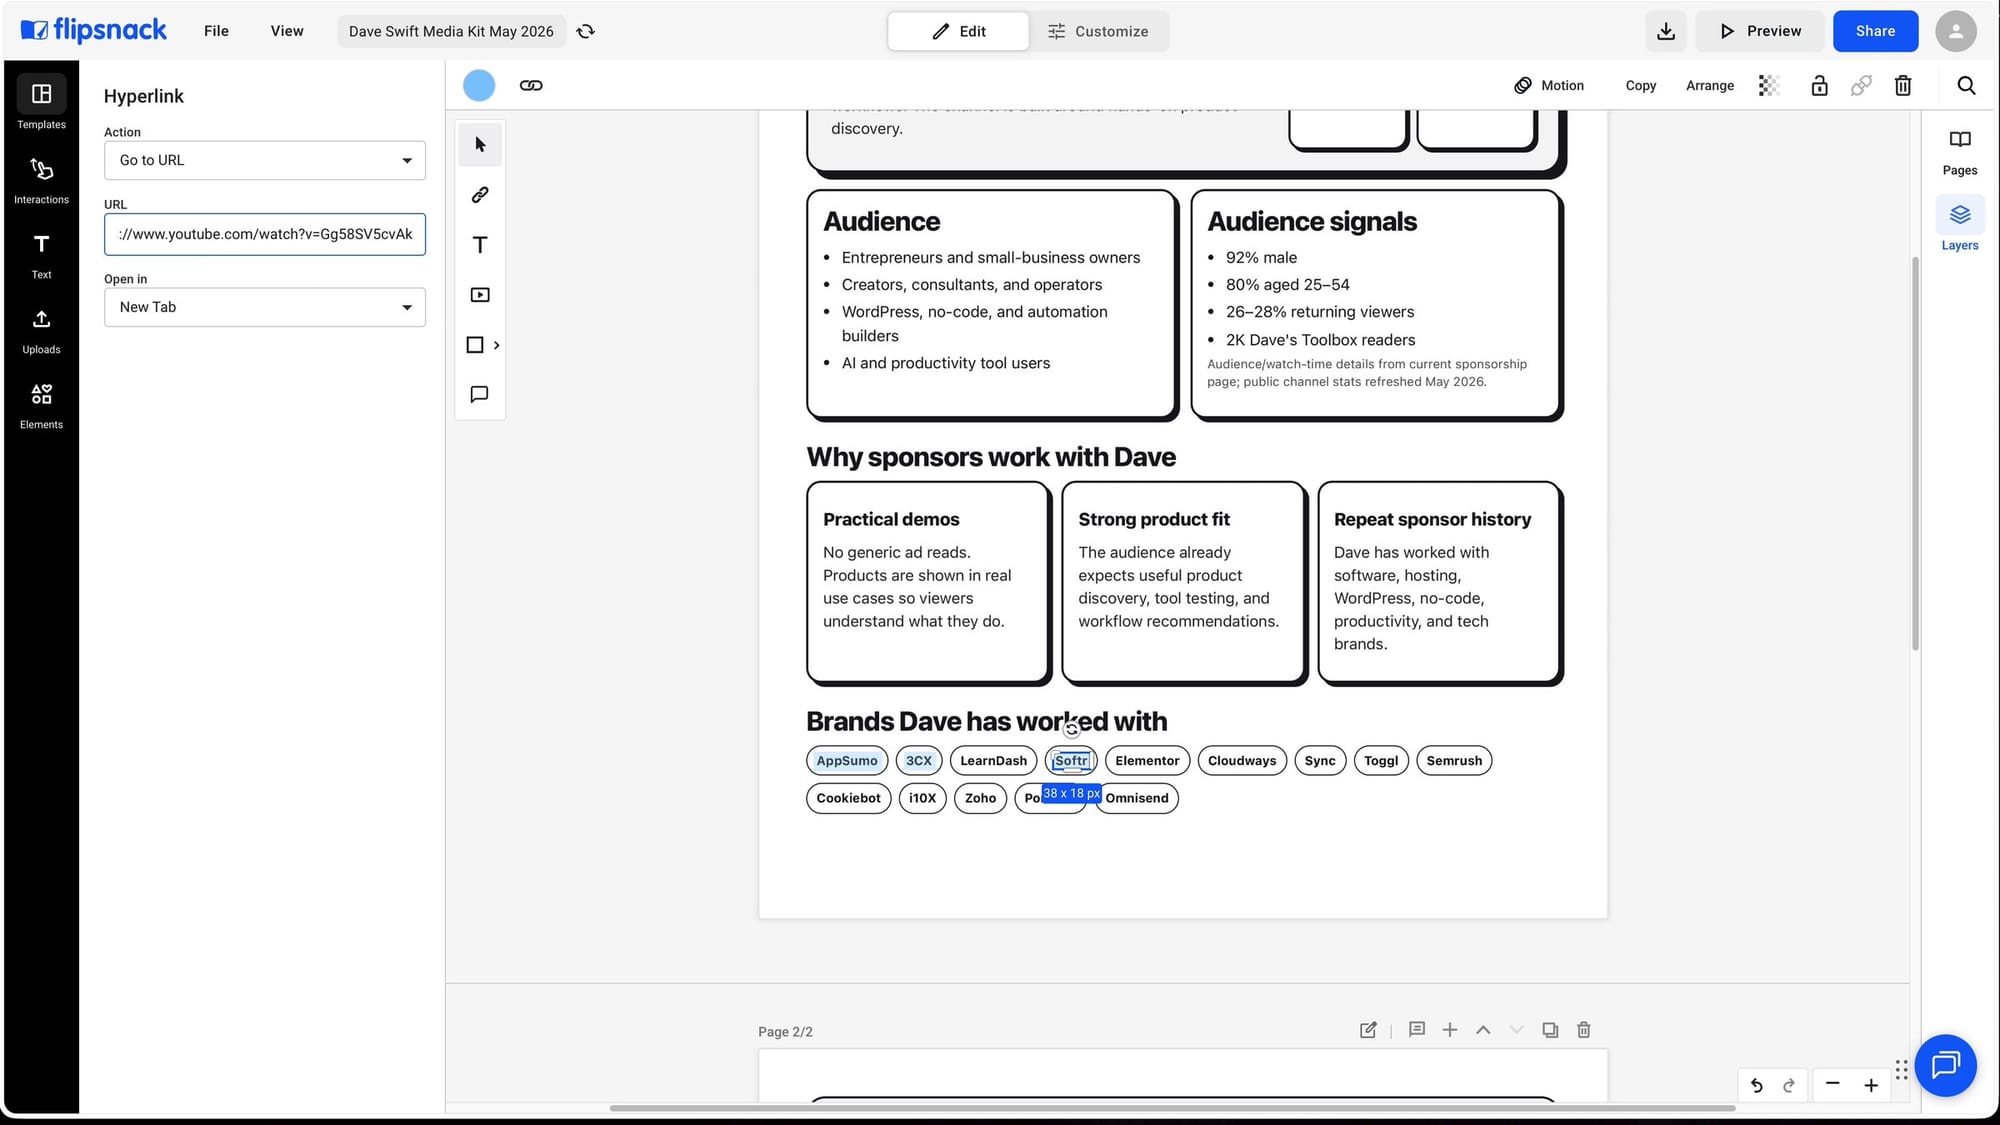
My media kit has a set of buttons for different types of sponsorships. In the PDF, they did nothing. In Flipsnack, I drew a link hotspot over each button and pasted in a URL.
The default action opens the link in a new tab. You can also set a hotspot to download something or go to a profile. I linked the buttons to some of my videos (3CX, AppSumo, Softr and Toggl) and finally fixed that broken booking button.
A few things that make this faster:
- Zoom in with the zoom controls when you need to be precise.
- Make the clickable area big. I selected the whole button, not just the text. People are used to clicking anywhere on a button, so give them a wide area to click.
- Copy and paste hotspots. Right-click, copy, paste it onto the next button, then change the URL. Hotspots snap into place when they line up with each other, and there's a grid to help.
- Option-drag to duplicate if you're a power user.
- Use the arrow keys to nudge a hotspot into exactly the right spot.
Step 4: Add your brand colors
The little menu in the editor only shows a few tools. Click Interactions for the full list. There are a lot of options, including buttons that open videos, which I'd probably use for every card on page 2 next time.
You can also save your brand colors so you don't have to look them up every time. Choose Add Brand Colors, then Add Color, and paste in your hex code. I reloaded the page to check, and my brand color was still there.
Step 5: Add a button that sends people to page 2
This was the change I most wanted. Page 1 is the page everyone sees. Page 2 has the pricing. Much like a website, sometimes you have to tell people there's more and they can keep going.
I built a button from scratch:
- Add a text box. I chose a subheading and typed "See options." Resizing the box makes the text bigger or smaller. There are plenty of fonts, and you can upload your own.
- Go to Elements, then Shapes, and pick a rectangle. Place it over the text, then right-click and move it backward so the text sits on top. Change the color to match your brand.
- Draw a link hotspot over the whole button.
- Under Action, choose Go to Next Page.
There's an easier way if you don't need a custom look. In Interactions, you can drag in a ready-made "go to next page" control, or one that jumps to a specific page. That's handy if you want to say, "Pricing is on page 27," and take people right there.
When I previewed it, I clicked my button and the page flipped over.
Why bother when readers can use arrow keys or the arrows on screen? Because a non-technical audience will find a flipbook novel and exciting, and that novelty is also a point of failure. If someone clicks around and can't figure out what to do, they won't blame themselves. They'll decide it wasn't clear. A big obvious button takes the guesswork out.
Step 6: Preview everything
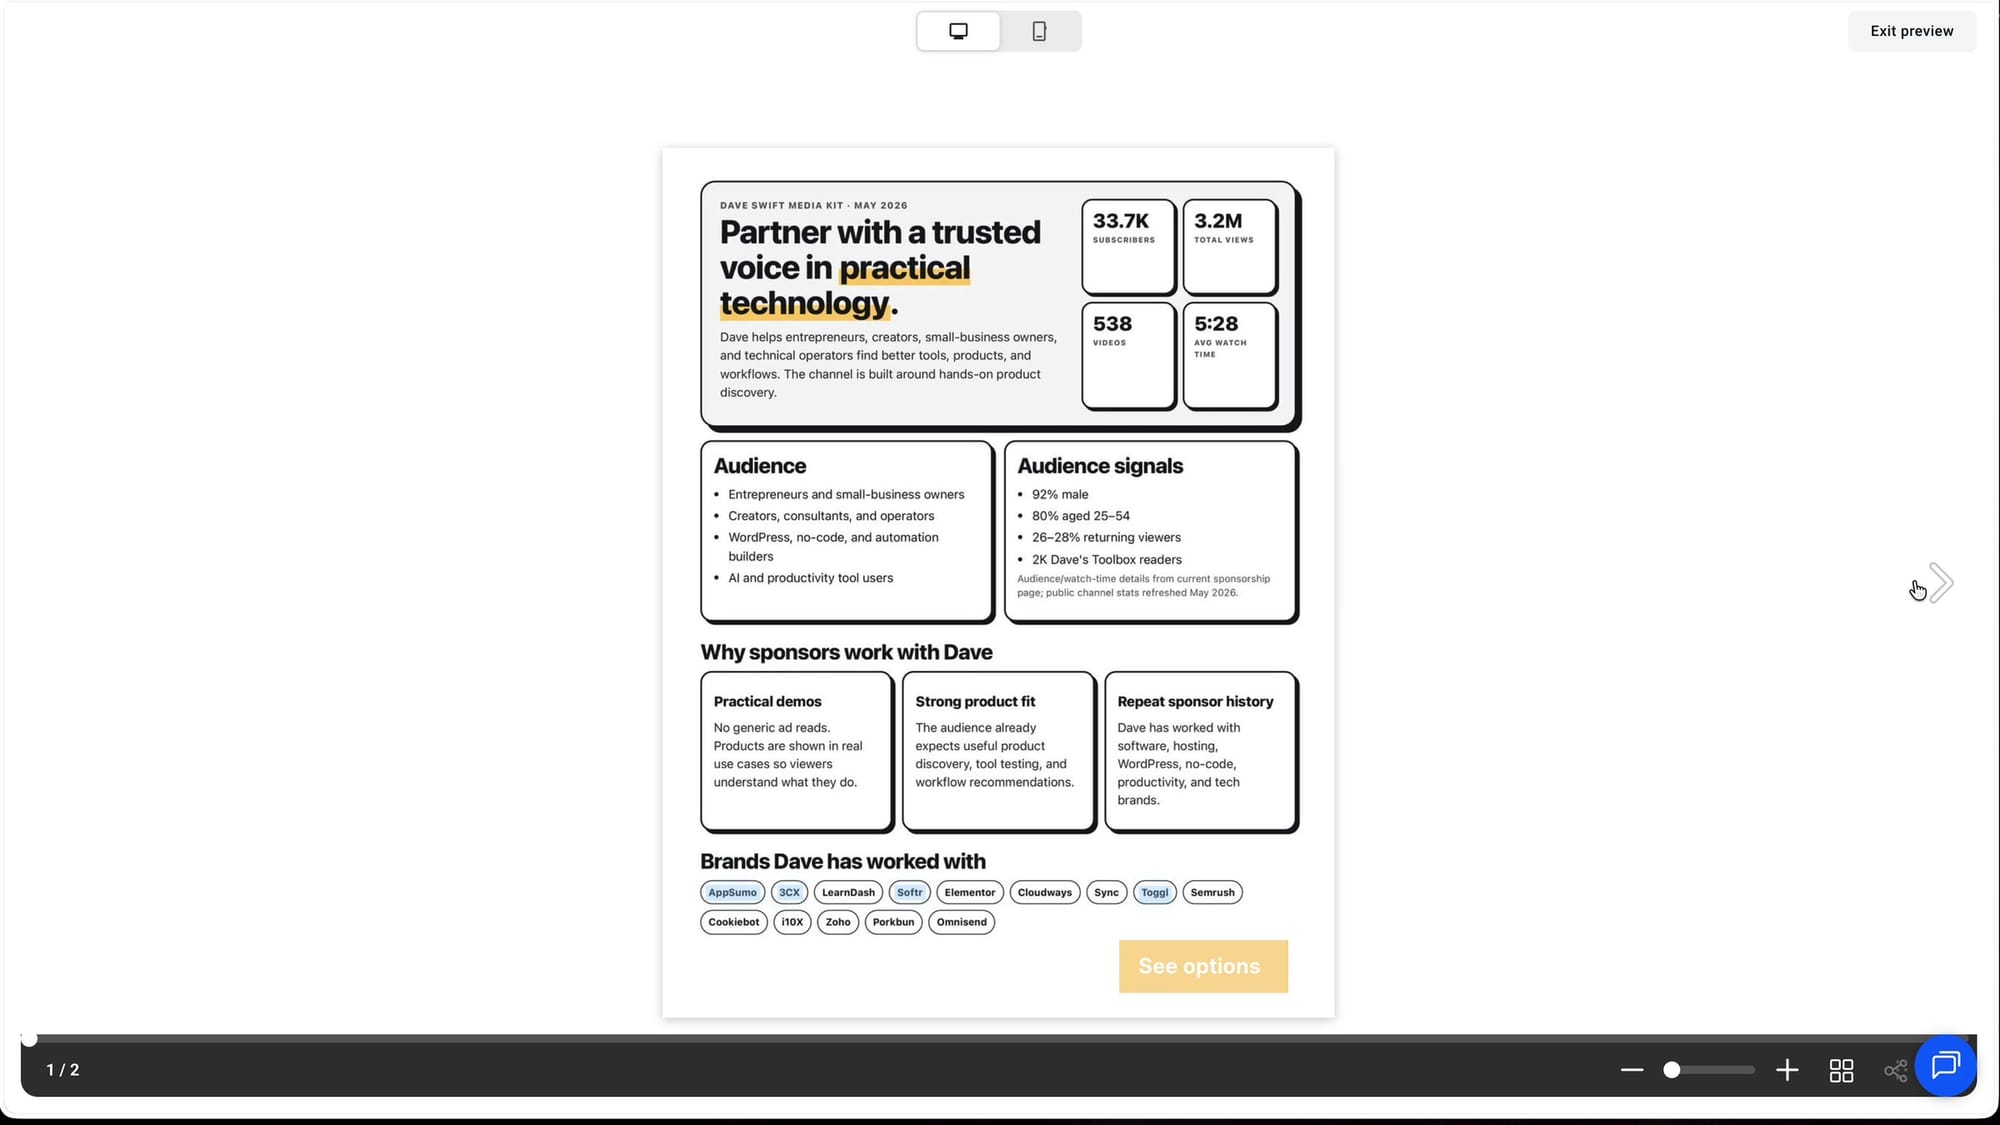
Use the preview before you share. In mine:
- The links showed up blue. You can change link colors, but people generally know blue means clickable, so I left them.
- My "See options" button flipped to page 2.
- The video opened in a pop-up window over the page. When you close it, you're right back in the document. You can also play videos inline.
- My booking button opened my booking page in a new tab. Closing that tab took me right back to the flipbook.
Step 7: Add social links, a newsletter signup and a contact form
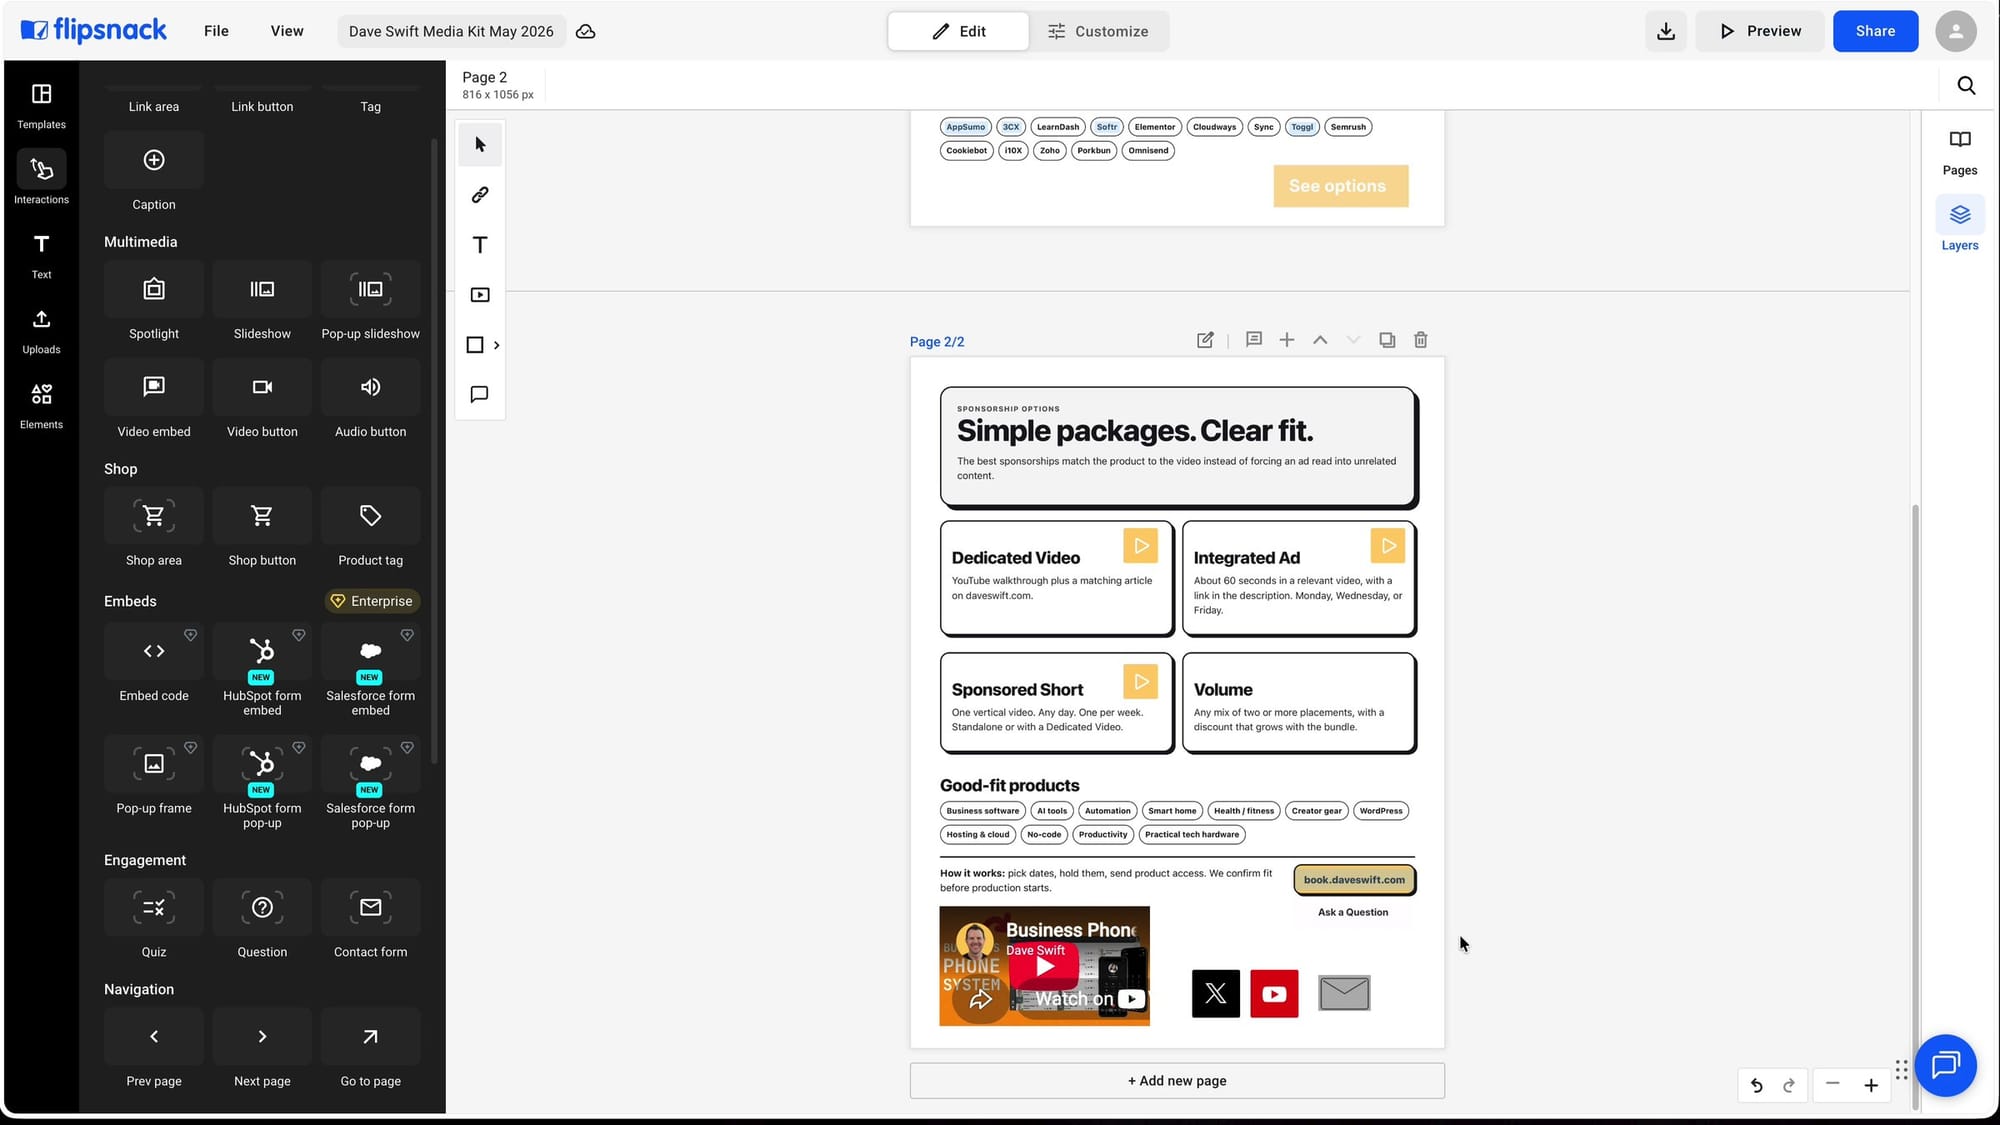
A few last additions:
Social icons. Flipsnack has icons for most major platforms. I added X and YouTube. You can recolor them, so I made YouTube a darker red and X closer to black.
Newsletter signup. I found an email-style icon in the shapes library, dropped it in, and drew a link hotspot over it that points to my newsletter signup page.
Contact form (Business). In Interactions, drag in a contact form. I sized it to match my other button. Each form gets a title and a description, then you add fields. I used:
- Email address
- First name
- Website
- A paragraph field so people can ask a question
Save the form, then give the button a label. Mine says "Ask a Question." I made it white to match the background so it reads as a secondary option, not something that competes with the main button. When someone clicks it, the form pops open over the page.
Step 8: Choose how to share it
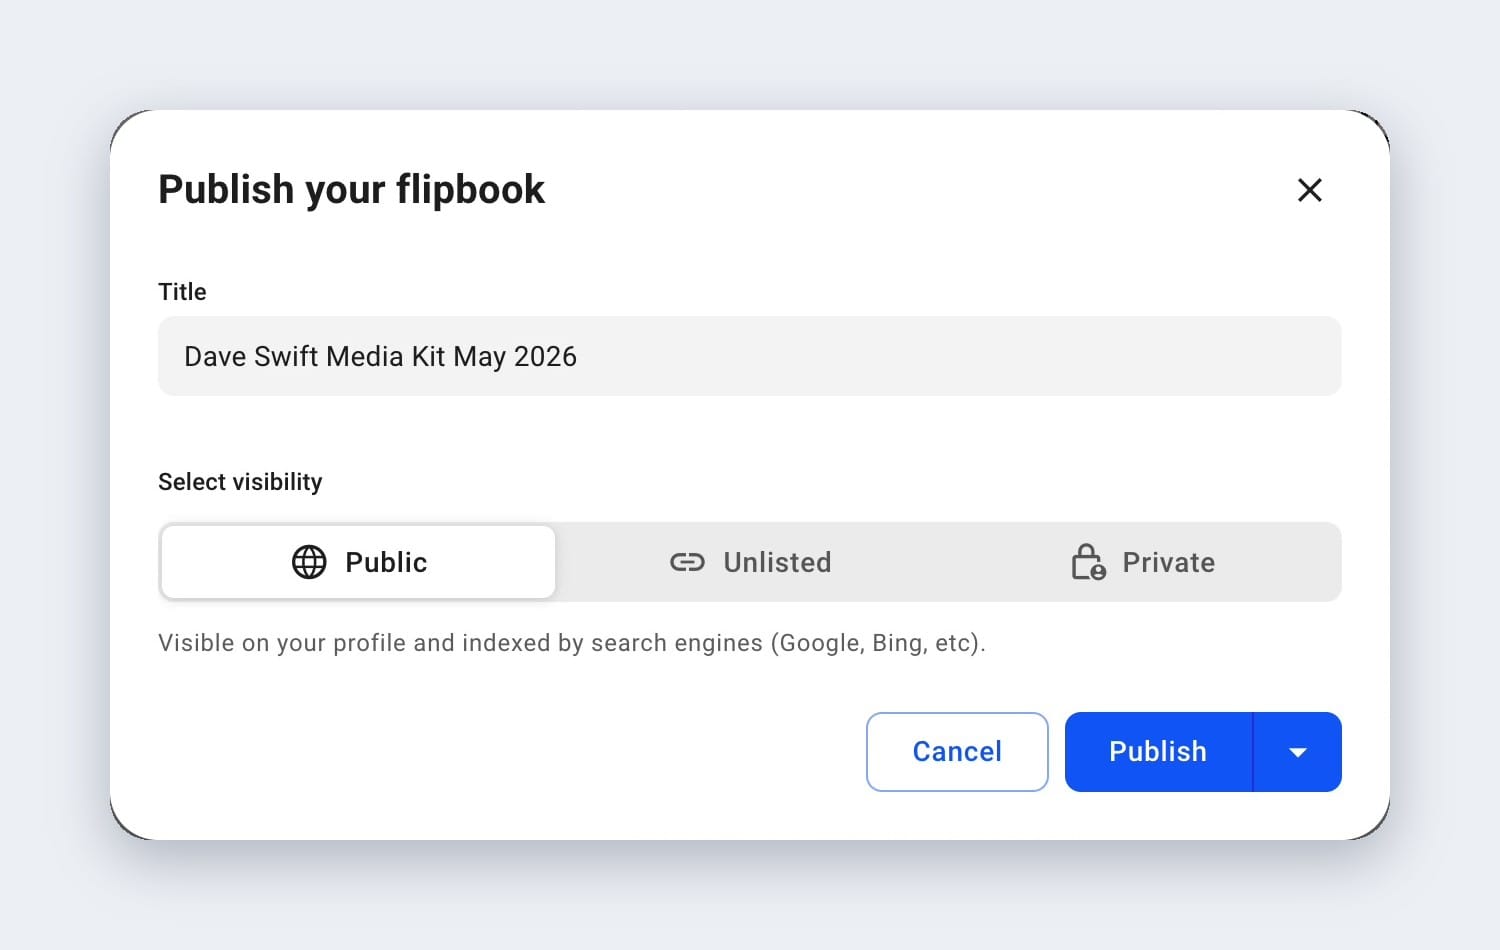
Click Share, and you'll get three privacy options:
- Public: Anyone can find it, and it can be indexed by Google and show up in search results. Don't use this for a private agreement between two companies or anything delicate.
- Unlisted: Anyone with the link can open it, with no password. If you're sharing over email, this is the right choice for most business interactions.
- Private: Password protection (Pro), people verifying with a code (Enterprise), or only your team on your Flipsnack account.
You can also invite people by email (Business). Type addresses one at a time or import a CSV. Enterprise adds a leak protection watermark that shows the viewer's email address on the document, so if someone leaks it, you'll know who it was.
Set an inactive date (Business)
This option is easy to miss, so I want to point it out. Click the disclosure triangle next to Publish, and you can set an inactive date. After that date, nobody can open the document.
That's a marketing tool you can't really get with a PDF. Say I'm booking through December and raising my rates in January. The media kit with the current rates can say "book now," and it actually stops working when that offer ends.
I set mine for November 14 and published.
Test it like a recipient
After publishing, I opened the exact URL in a private browser window. I couldn't get in, because the flipbook was shared only with specific email addresses. That's the security working the way it should.
Then I opened the invite email as the recipient. The link loaded the flipbook, and I could zoom in, click links, open the video and fill out the contact form.
Step 9: Use trackable links (Pro)
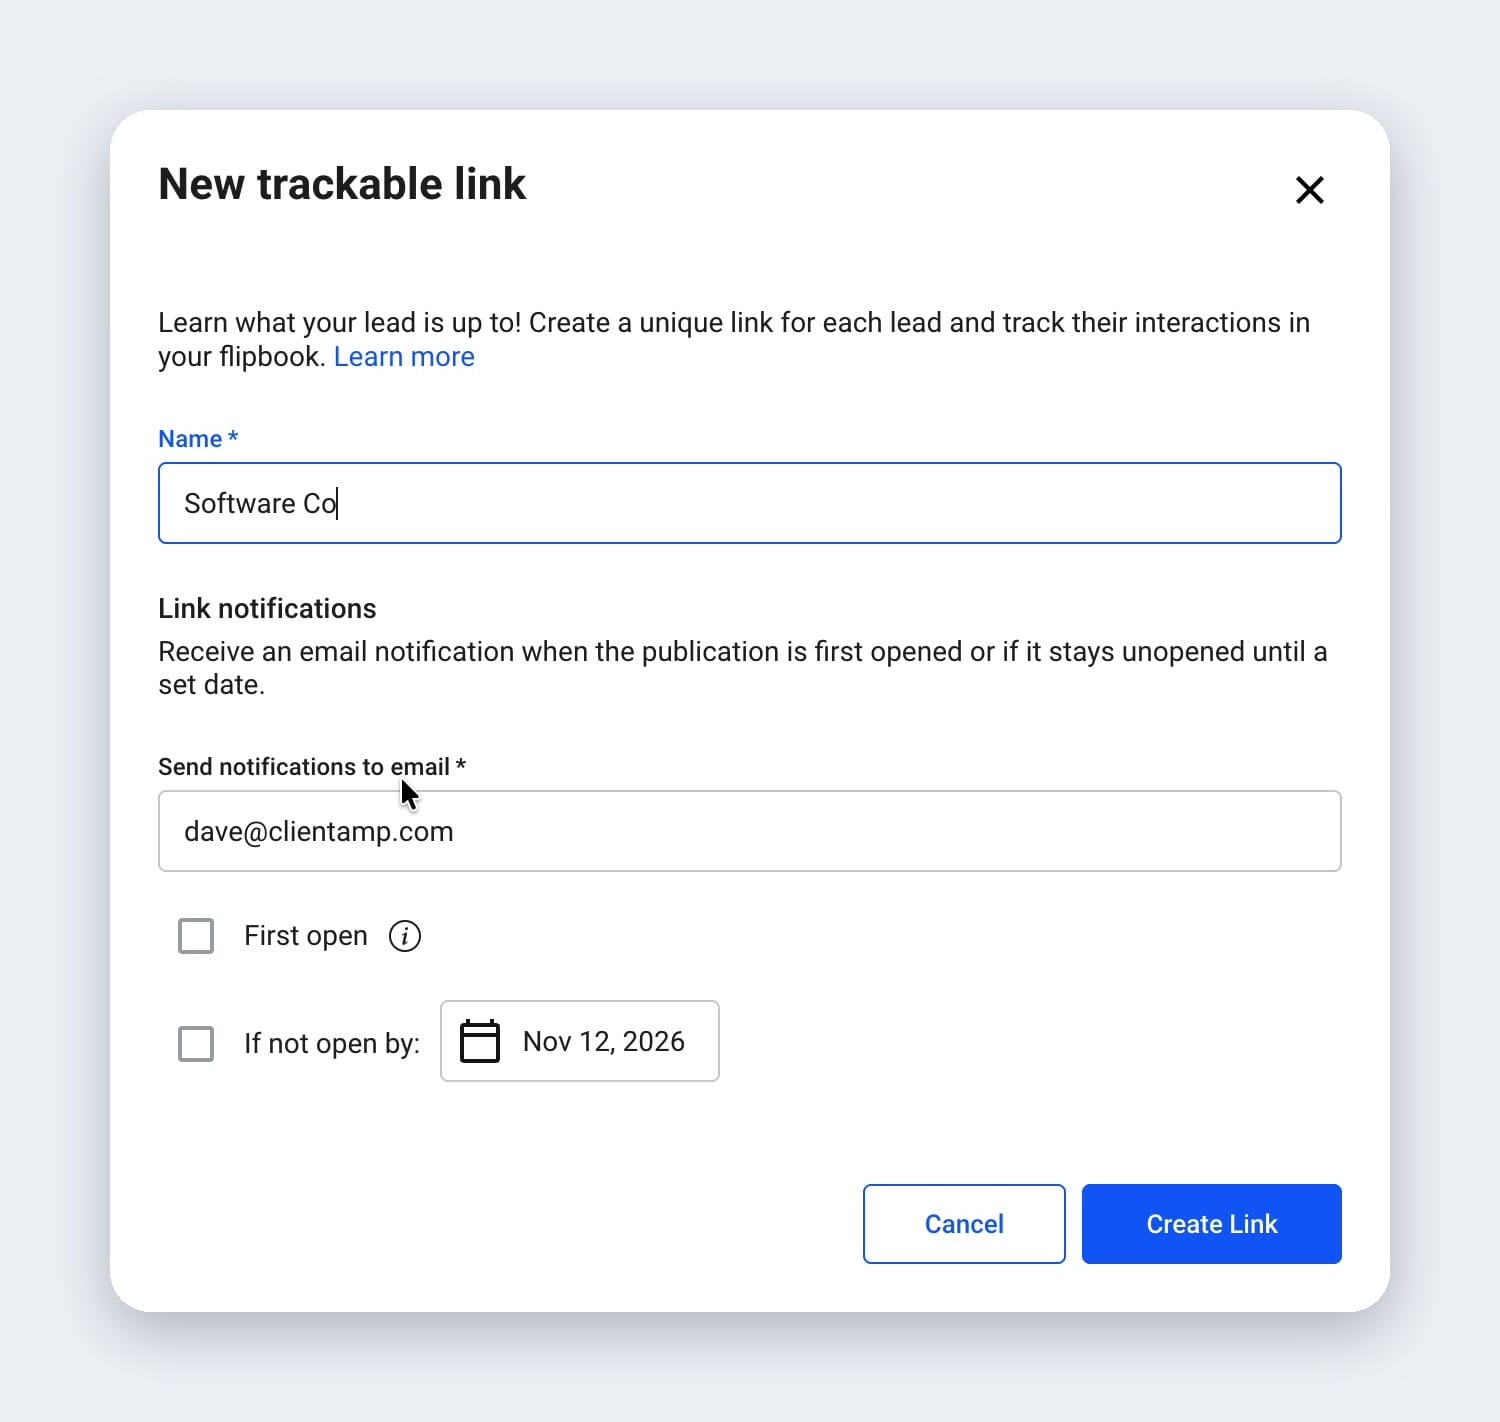
This is the feature I'm most excited about. A trackable link is a custom link for one person, so you know exactly what that person did with your flipbook.
Flipsnack doesn't magically know who someone is. The name you give the link is what tells you. If I create a link called "Software Company" and send it only to that software company, every view on that link is them.
One catch: trackable links don't work while the flipbook is shared only by email invite. It doesn't have to be public, but it can't be email-only. I switched mine to unlisted from the overview screen and updated the flipbook.
To create one:
- Click Create Trackable Link.
- Give your lead a name.
- Under Link notifications, enter the email address where you want alerts. Flipsnack can email you when the link is first opened, or if it's still unopened by a date you pick.
- Choose your tracking options.
- Create the link and send it.
Say the software company opens the flipbook, flips to page 2 and clicks one of the video links, but never clicks the booking button. After a short delay, that link's analytics show you that, along with the date range, which flipbook it was, and the lead's name.
Step 10: Read the analytics
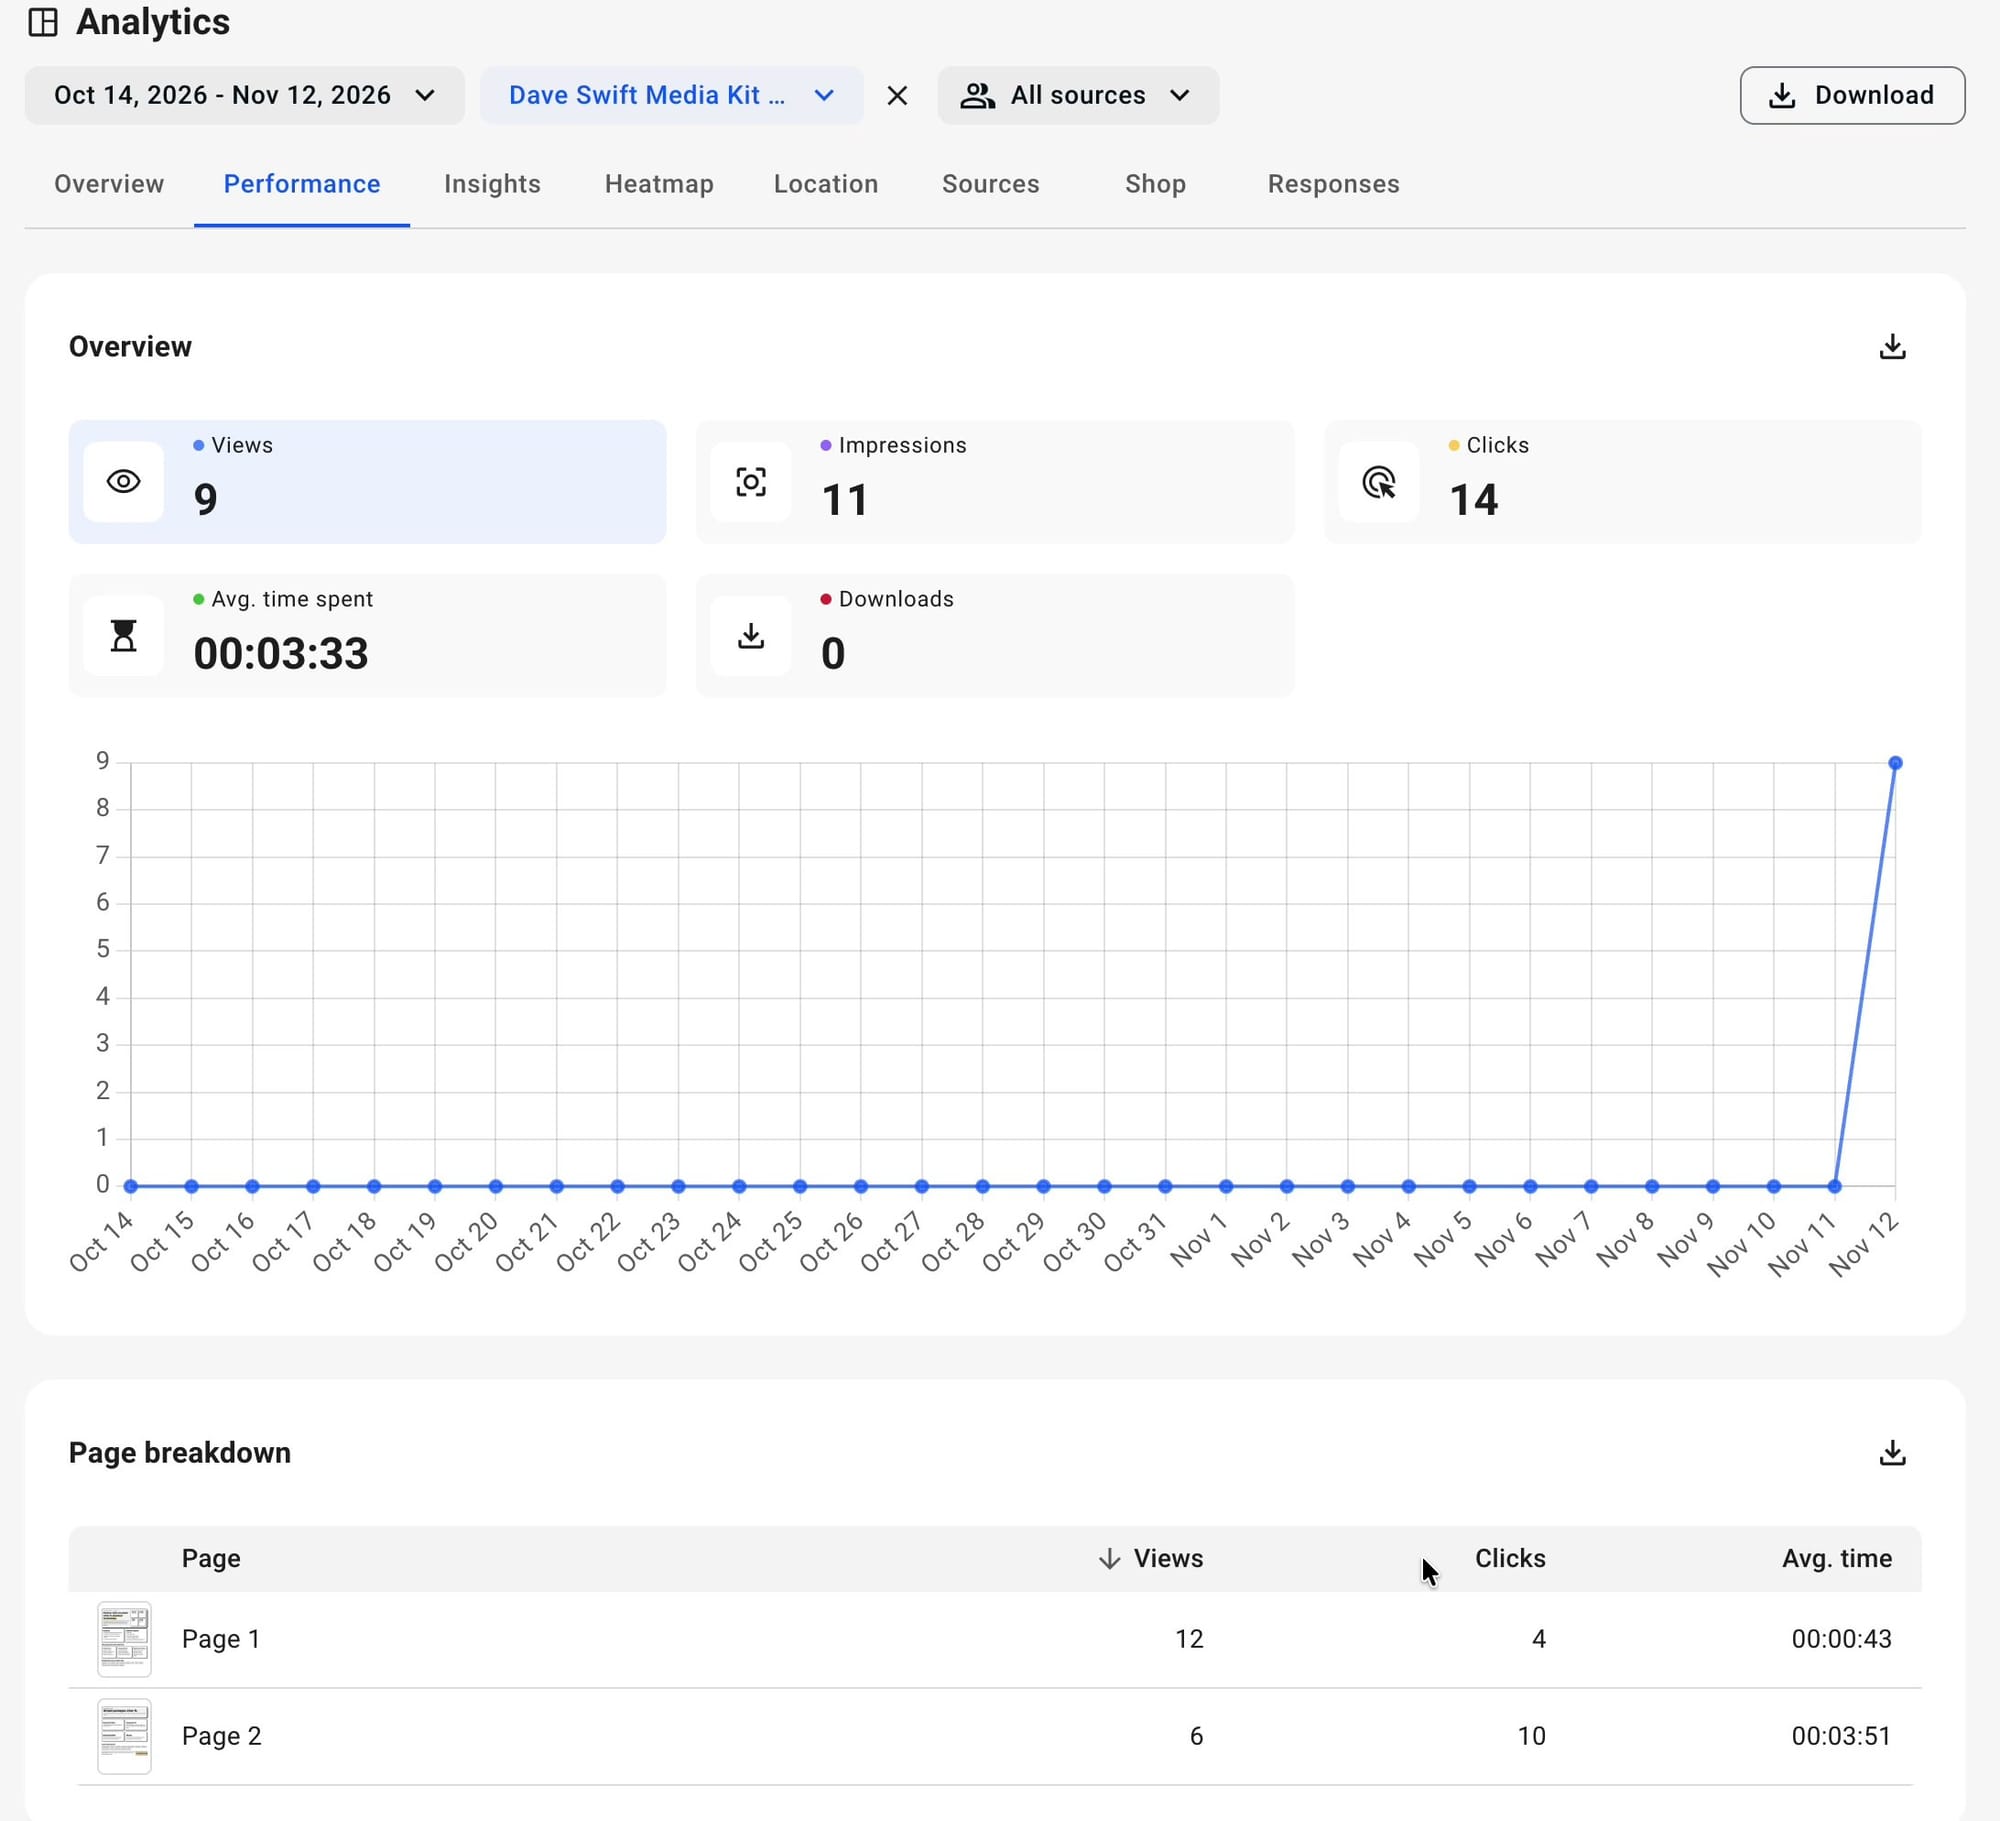
Once people start reading, here's what Flipsnack shows you.
Overview. Views, impressions and clicks. In my test I had 9 views and 11 impressions (I reloaded a few times), plus a click count. You can also see time spent on each page.
Detailed analytics. Views per day, locations, where views come from (direct or an embed on your site) and devices (desktop, tablet or mobile). My single tracked view showed up correctly as one desktop in the United States. When I opened the flipbook on my phone, that showed up, too.
Responses. This is where leads land: lead capture forms, quizzes and contact forms. My "Ask a Question" submission was there with the full details. You can export responses, and you can have more than one form in a flipbook.
Page breakdown. This is the one I'd watch. In my test, page 1 got 12 views and page 2 got 6. That's normal, because page 1 is where everyone lands. But in a 20 or 30 page document, you'd probably see some pages barely get looked at. That tells you where people get bored and drop off. Move important information earlier, or make the content more interesting so they keep reading.
You can also see clicks per page. If a link is pulling people out of the document before they reach your offer, maybe that link shouldn't be there.
AI insights. Once there's enough data, you can run AI insights. It uses AI credits. You get a written summary of general insights, page engagement and element engagement. Mine noted that the "go to page 1" link was clicked once and the "Ask a Question" form was clicked once. If you really want to get into the data, I'd run it at least once a week.
Heat maps (Enterprise). See how far people got on each page and where they clicked.
Integrations. Beyond exporting, there are webhooks, Google Analytics (Pro), Zapier (Business) for sending data to tools like Mailchimp or ActiveCampaign, and HubSpot and Salesforce (Enterprise).
Other ways to share: QR codes and website embeds
Links aren't the only option. The share menu also has:
QR codes. If you print something, people can scan the code and open the flipbook. Picture an open house where the flipbook has more photos and details about the home. Visitors scan the QR code, flip through it there, and take the information home with them.
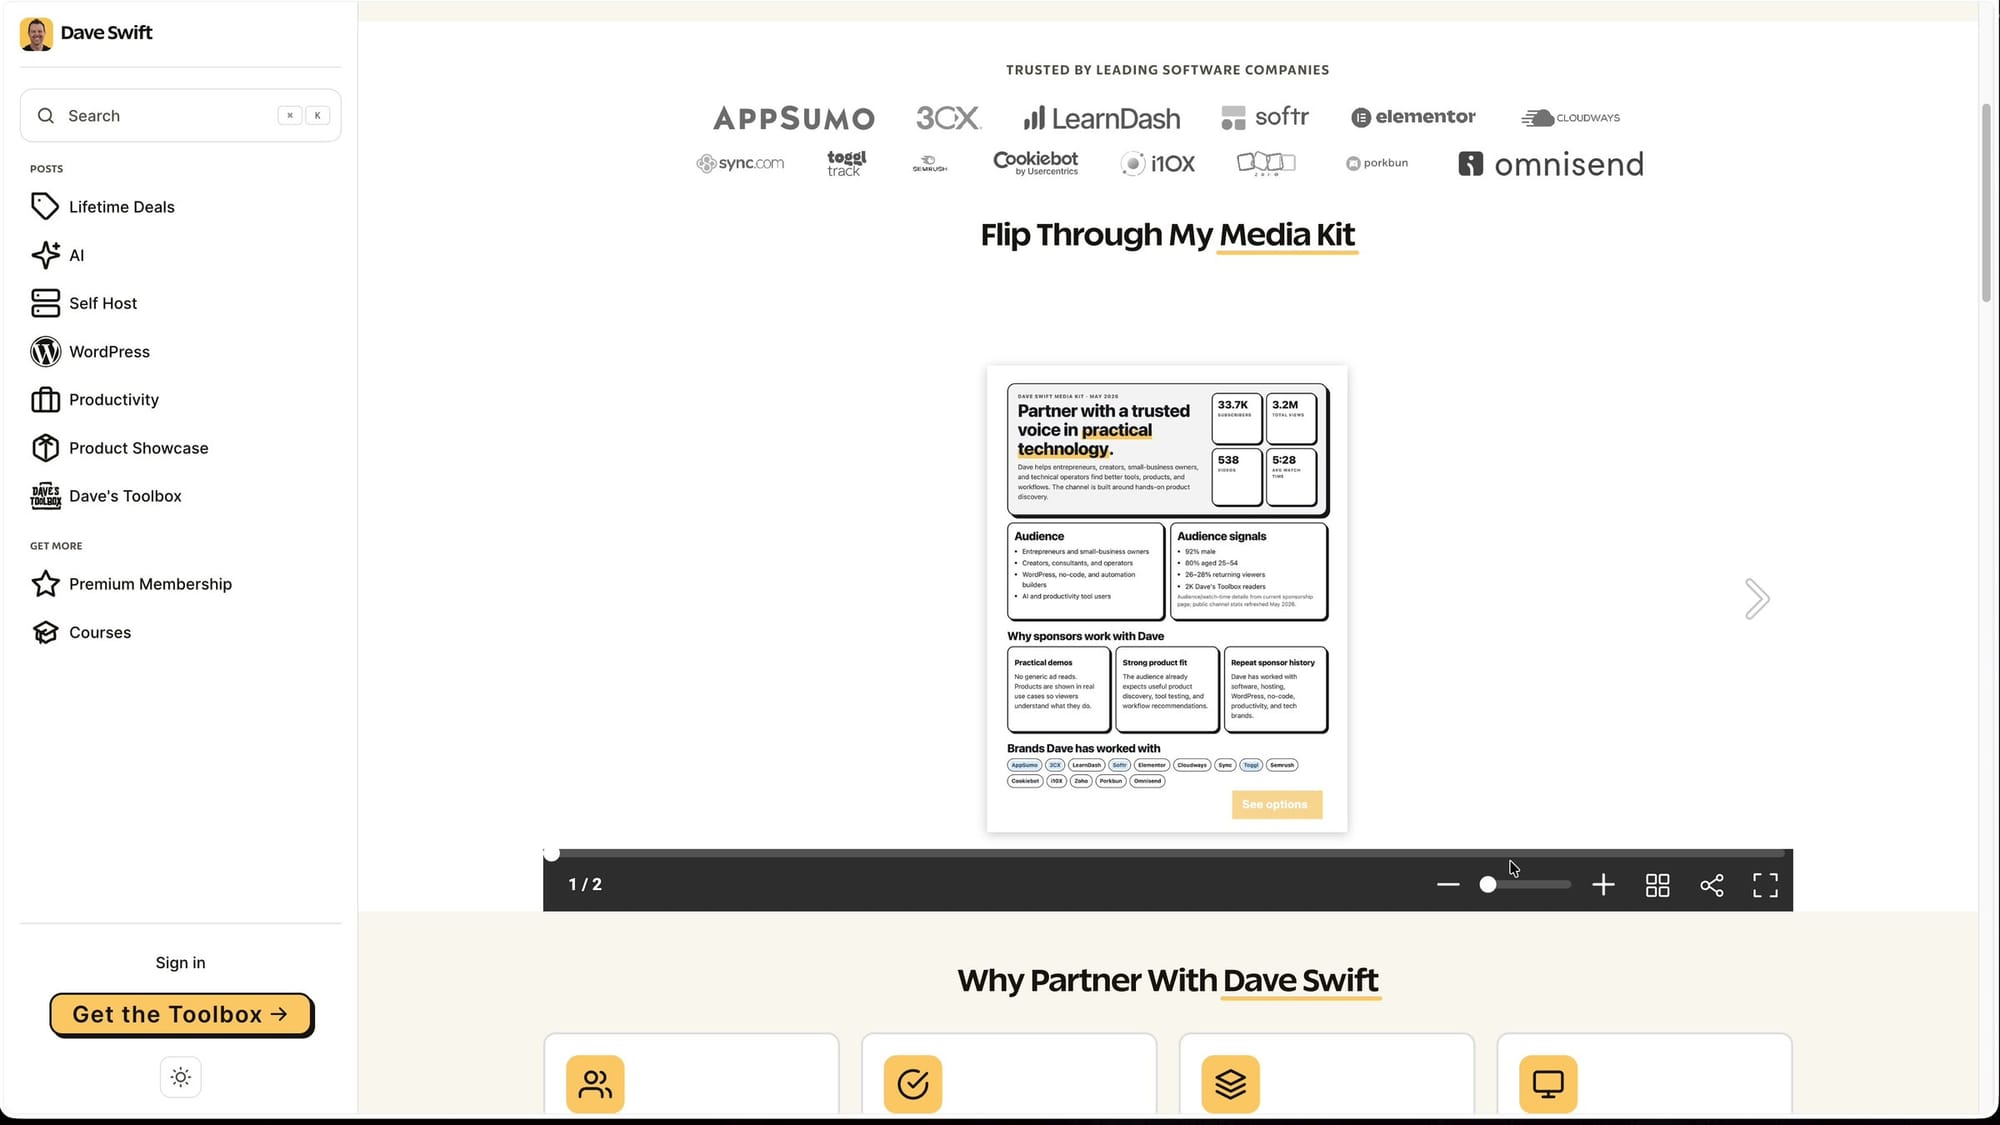
Website embeds. I chose the responsive embed, so I only had to set a height (about 600 pixels), and copied the iframe code. On Enterprise, you can restrict the embed to your own domain.
I pasted it onto the sponsorship page of my website under a new heading, "Flip Through My Media Kit." Visitors can flip through it, zoom in and read the whole media kit without downloading anything. You can even go full screen.
Bonus: Edit the PDF itself (beta)
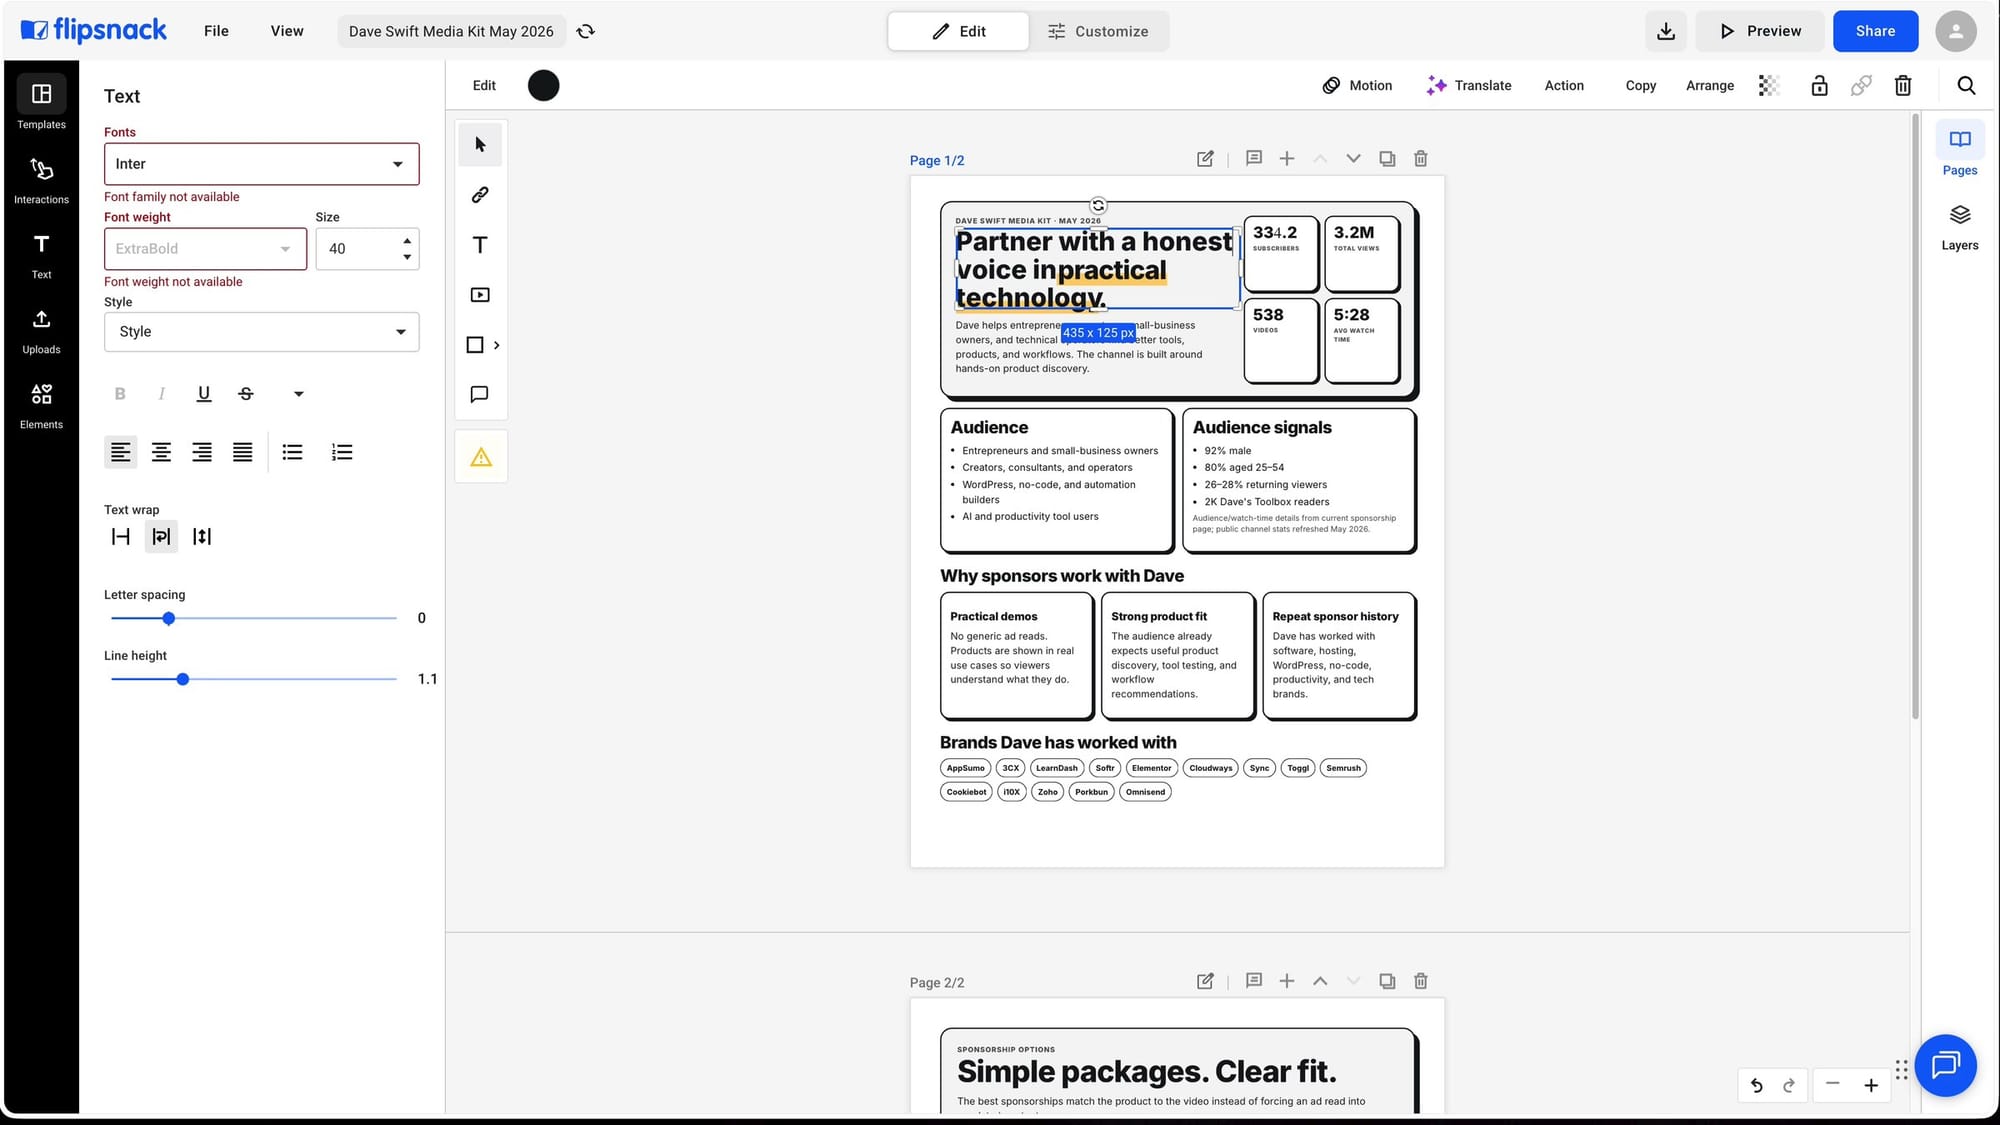
There's one more feature I really like: Edit PDF, which is in beta. Some things might not work the first time.
When you upload a PDF, choose upload with full editing support. Then you can edit the PDF's existing text right in Flipsnack. I changed "trusted" to "honest" by deleting the word and typing a new one, and it fit the page perfectly. Then I updated my video count to 590.
Remember my problem from the start: when my numbers change, I have to make a new file and send it again. This is the fix, without going back to whatever tool you used to make the PDF.
It won't work with every PDF. In my experience, it worked surprisingly well a large chunk of the time. It's definitely one to keep an eye on.
Should you use Flipsnack?
Can you just send a PDF? Of course. But then you're just like everybody else who's sending out PDFs.
I always look for an edge in marketing: be memorable, do something different, and stand out. A flipbook with real video, an obvious button and a contact form is a better experience for the person reading it. A tracking link means you're not guessing whether they read it.
Flipsnack is a good fit if you:
- Send proposals, media kits, brochures or sales sheets to people who aren't very technical
- Want to know who read what before you follow up
- Change your prices or numbers and are tired of re-sending files
If you just need to post a document online occasionally, start with the free plan. If tracking is the point, you'll want Pro. If you need the contact form or expiring access, you'll need Business.
My advice: take the one PDF you send most often. Upload it, add one video and a button to the page that matters, and send a trackable link to your next lead. Then check the page breakdown before you follow up.
Try Flipsnack free, and get 20% off a paid plan with my link (code DAVESWIFT).
Get Dave's Toolbox
The tools I actually use, every Tuesday. Free. No spam.
No cost. No spam. Unsubscribe anytime.